KoreaDevKNOWLEDGE SHARING

Content typeLearn

AI INFRASTRUCTURE · 12 / 12

AI infrastructure capstone project

Turn requirements into a design, and complete build-out, acceptance, fault injection, recovery, operations, and handover as a single evidence package.

Difficulty
Intermediate
Structure
Core units 3 · Judgment activities · Three-stage assessment

NEW HIRE ONBOARDING

Start in the order you would receive your first assignment

So that even a new hire with no prior IT background can follow along, we start with the situation, the task, the evidence, and when to report, before difficult definitions.

  1. 01

    Read the situation in one sentence

    Connects the deliverables of the earlier courses, from requirements through design, build-out, failure testing, and shift handover. Unmeasured performance and unverified recovery are never recorded as completed acceptance.

  2. 02

    Today's assignment

    Document the stop conditions and recovery evidence for incident recovery and operational handover in a work record.

  3. 03

    Evidence that shows the work is complete

    Reviewed against official documentation and training output. Commands and performance tests on real hardware are unconfirmed.

  4. 04

    When to stop and ask a senior colleague

    The functional test passed, but there is no restore test and no confirmation of access for the next-shift operator. What is the acceptance verdict?

Unpack unfamiliar terms first

SLO (Service Level Objective)
A measurable quality target that a service aims to achieve over a defined observation window.

Operational question for this course

Can another operator accept and recover from the same evidence?

Connects the deliverables of the earlier courses, from requirements through design, build-out, failure testing, and shift handover. Unmeasured performance and unverified recovery are never recorded as completed acceptance.

CORE UNIT 1 / 3

Requirements and architecture design

Turn the SLO, capacity, security, and failure domains into a design document.

Difficulty
Intermediate
Structure
Lessons 5 · Labs 2 · Assessment

Diagrams and tables: composed by the author using each lesson's official primary sources. Find the originals and review dates at the end of that lesson.

PREREQUISITE CHECK

Three things to check before reading

This is not a test of memorized answers. Think about each question first, then open the explanation to review the foundational concepts used in this course.

1Does this unit send commands to real equipment?

No. Read the training output in the browser and make the judgment there. Any separate reproduction is done only in an approved isolated environment.

2What permissions and environment must you confirm before the lab?

Reading in the browser and writing a work plan only. No changes to real equipment or customer traffic.

3How do you record a value you have never seen before and a test you have not yet run?

Record it as unconfirmed. Distinguish expected training output from actual measurements, and do not fill in blanks with unapproved work.

TEXTBOOK GUIDE

Main text that covers each concept from its background to the criteria for judging it

We explain the material section by section so readers new to IT can connect causes and effects without memorizing terms.

  1. Explain the components and failure boundaries of requirements and architecture design using a diagram.
  2. Judge the state of requirements and architecture design from command output and observed values.
  3. Document the stop conditions and recovery evidence for requirements and architecture design in a work record.
Requirements and architecture design Lab environment and safety boundaries
HardwareFixture bundle for 2-node design, acceptance and fault evidence
SoftwareJSON work records and Kubernetes API v1 examples
Required permissionsReading in the browser and writing a work plan only
NetworkingNo changes to real equipment or customer traffic

Reviewed against official documentation and training output. Commands and performance tests on real hardware are unconfirmed.

Applies to version: Kubernetes API v1 · Training fixture 2026.2 · Manuscript review date: 2026-09-01

CONCEPT FLOW

How the chapters connect

The chapters are not isolated short answers to memorize. Follow them from left to right to see how each chapter's concepts support the next decision.

  1. 1.Start the checks at requirement R1
  2. 2.Fix the lab target for placement
  3. 3.Distinguish the output of the common boundary from its meaning
  4. 4.Make the go/stop decision on the design verdict
  5. 5.Re-verify recovery of requirements and architecture design
Requirements and architecture design: the overall map. If you lose track while reading the detailed explanations and chapters below, return to this sequence.

CONTROLLED EXPLANATION

Follow the evidence to check, one step at a time

Current explanation · 1/5 · Start the checks at requirement R1

Up next: Fix the lab target for placement

  1. Start the checks at requirement R1

    Do not guess the cause and start by changing settings. If you group the following evidence into records from the same time window, another operator can reproduce the boundary at which the expected state broke.

  2. Fix the lab target for placement

    Lab scenario:: Read the placement fixture and write the reason it fails the rack-failure requirement plus two design corrections. Instructions:: In the browser, read the training output below and write a verdict. Do not send the commands to real equipment. To reproduce the commands separately, prepare an approved isolated environment with the relevant tools and example files. Save the entire output, and if the requirements are unconfirmed or the common boundary is unaddressed, do not move on to the next change.

  3. Distinguish the output of the common boundary from its meaning

    The point is not to memorize the values themselves but to confirm that, even with different node names, the same rack and PDU mean these are not independent failure domains. The values shown are reproduced examples for training, not measurements taken on real equipment. Identifiers and values can differ by device, driver, and cluster.

  4. Make the go/stop decision on the design verdict

    You succeed when you link requirement R1 to the unmet boundary and propose either separate placement or an approved requirement change, along with a verification test. Record the execution time, target identity, commands used, key output, verdict, and next action together in the result.

  5. Re-verify recovery of requirements and architecture design

    If an assumption is wrong, trace back the affected requirements and follow-up tests. Do not just swap hardware; also update the design revision, verification items, and acceptance criteria. After recovery, measure again with the same commands and the same success criteria. Do not close an incident just because things appear normal.

Conceptual explanation 01

Design the replica count together with shared failure boundaries

SLO (Service Level Objective): the measurable quality target a service aims to meet over a defined observation window.

Design is not a product list; it is the work of turning user requirements into measurable conditions and dependencies. The maximum number of users alone does not determine the GPU count. You also need the input length, concurrency, response latency, availability, data retention, and operations staffing.

Linking requirement IDs to SLOs, resource assumptions, failure domains, and verification items makes the reasons for design choices traceable. Mark items without figures as unconfirmed and define the tests that will resolve them. If you pick equipment first and fit the numbers afterward, the failure boundaries you need will be missing.

The fixture places two replicas on different nodes, but they use the same rack PDU. There is headroom for a node failure, yet both stop on a PDU failure. If rack-level availability is a requirement, either split the power paths or renegotiate the requirement through the approval process.

Read the placement fixture, and write down why it fails the rack failure requirement along with two design fixes.
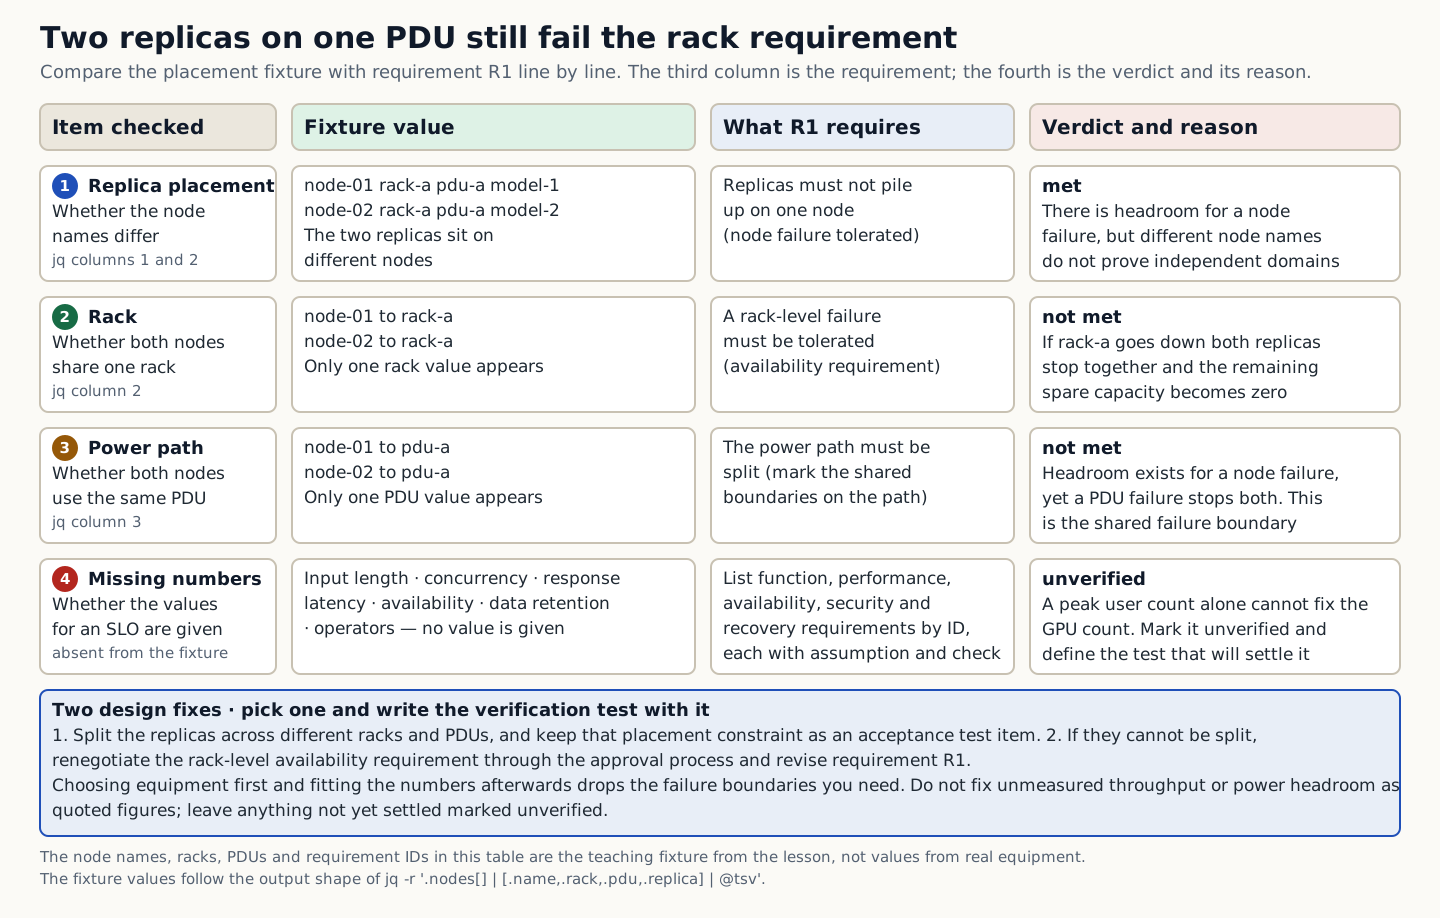
A table comparing the placement fixture of two nodes with requirement R1, showing that the two items sharing a rack and a PDU are not met.
How to read the figure Design the replica count together with shared failure boundaries. The table compares the placement fixture with requirement R1 line by line, and badges 1 to 4 on the left give the order. The first column is the item checked, the second is the fixture value, the third is what requirement R1 requires, and the fourth is the verdict and its rationale. Replica placement is split between node-01 and node-02, so it is met, but both racks are rack-a and both PDUs are pdu-a, so the second and third rows are not met. In the fourth row, input length, concurrency, response latency, availability, data retention, and operations staffing have no values in the fixture, so they remain unconfirmed, and tests to resolve them are defined. The last blue box states the rule: choose one of the two design fixes and write down its verification test along with it. The node names, racks, PDUs, and requirement IDs in the table are a training fixture, not values obtained from real equipment. Source: composed by the author based on Google SRE Workbook: Implementing SLOs · K3s Architecture.
Why does this happen?
Linking requirement IDs to SLOs, resource assumptions, failure domains, and verification items makes the reasons for design choices traceable. Mark items without figures as unconfirmed and define the tests that will resolve them. If you pick equipment first and fit the numbers afterward, the failure boundaries you need will be missing.
When is it a problem?
If requirements are unconfirmed or shared boundaries are unaddressed, there are insufficient grounds to proceed.
Common beginner misconceptions
Do not treat unmeasured throughput or power headroom as a firm figure in a quote. Write the assumptions and units in the cost table, and mark items that are not yet settled as unconfirmed.
How to verify it yourself
Organize the functional, performance, availability, security, and recovery requirements by ID. Attach assumptions and a verification method to each.
To summarize this sectionYou succeed when you link requirement R1 to the unmet boundary and propose either separate placement or an approved requirement change, along with a verification test.

CHAPTER 1 / 5

Start the checks at requirement R1

Do not guess the cause and start by changing settings. If you group the following evidence into records from the same time window, another operator can reproduce the boundary at which the expected state broke.

1. Organize the functional, performance, availability, security, and recovery requirements by ID. 2. Link each requirement to its assumptions and verification method. 3. Mark the shared power, network, storage, and GPU boundaries along the request path. 4. Write down the cost, the recovery burden, and the owner of any unresolved assumption.

CHAPTER 2 / 5

Fix the lab target for placement

Commands for reproducing the isolated environment · do not run them in the browser
jq -r '.nodes[] | [.name,.rack,.pdu,.replica] | @tsv' design.json

CHAPTER 3 / 5

Distinguish the output of the common boundary from its meaning

Expected output for training · not an actual measurement
node-01	rack-a	pdu-a	model-1
node-02	rack-a	pdu-a	model-2

CHAPTER 4 / 5

Make the go/stop decision on the design verdict

CHAPTER 5 / 5

Re-verify recovery of requirements and architecture design

CONCRETE CASES

Read the placement fixture, and write down why it fails the rack failure requirement along with two design fixes.

The fixture places two replicas on different nodes, but they use the same rack PDU. There is headroom for a node failure, yet both stop on a PDU failure. If rack-level availability is a requirement, either split the power paths or renegotiate the requirement through the approval process.

Wrong responses and boundaries to check

Do not treat unmeasured throughput or power headroom as a firm figure in a quote. Write the assumptions and units in the cost table, and mark items that are not yet settled as unconfirmed.

If an assumption is wrong, trace back the affected requirements and follow-up tests. Do not just swap hardware; also update the design revision, verification items, and acceptance criteria. After recovery, measure again with the same commands and the same success criteria. Do not close an incident just because things appear normal.

INTERACTIVE LAB 1 / 2

Lab 1 · Find the basis for a verdict in the output

Enter values in the browser and check the execution results and the failure and recovery paths. No commands are ever sent to real equipment or the NAS.

Lab scenario:: Read the placement fixture and write the reason it fails the rack-failure requirement plus two design corrections. Instructions:: In the browser, read the training output below and write a verdict. Do not send the commands to real equipment. To reproduce the commands separately, prepare an approved isolated environment with the relevant tools and example files. Save the entire output, and if the requirements are unconfirmed or the common boundary is unaddressed, do not move on to the next change.

node-01	rack-a	pdu-a	model-1
node-02	rack-a	pdu-a	model-2

The point is not to memorize the values themselves but to confirm that, even with different node names, the same rack and PDU mean these are not independent failure domains. The values shown are reproduced examples for training, not measurements taken on real equipment. Identifiers and values can differ by device, driver, and cluster.

INTERACTIVE LAB 2 / 2

Lab 2 · Plan for stopping and recovery

Enter values in the browser and check the execution results and the failure and recovery paths. No commands are ever sent to real equipment or the NAS.

Do not treat unmeasured throughput or power headroom as a firm figure in a quote. Write the assumptions and units in the cost table, and mark items that are not yet settled as unconfirmed.

KEY TERMS

Key terms in this unit

SLO (Service Level Objective)
A measurable quality target that a service aims to achieve over a defined observation window.

UNIT WORKBOOK

Exercises and worksheets for applying concepts to new situations

Start by checking basic principles, then expand to practical workplace decisions. After submitting an answer, you can see why every option is correct or incorrect, not just the correct answer.

Document the stop conditions and recovery evidence for requirements and architecture design in a work record.

PERSONAL WORKSHEET

A learning worksheet you adapt to your own environment

Your input remains only on the current browser screen and is not stored or transmitted externally. Use categories and pseudonyms instead of actual sensitive information.

OFFICIAL SOURCES

Verify against official sources

Reviewed against official documentation and training output. Commands and performance tests on real hardware are unconfirmed.

CORE UNIT 2 / 3

Build and acceptance testing

Complete revision-based build-out and layered acceptance evidence.

Difficulty
Intermediate
Structure
Lessons 5 · Labs 2 · Assessment

Diagrams and tables: composed by the author using each lesson's official primary sources. Find the originals and review dates at the end of that lesson.

PREREQUISITE CHECK

Three things to check before reading

This is not a test of memorized answers. Think about each question first, then open the explanation to review the foundational concepts used in this course.

1Does this unit send commands to real equipment?

No. Read the training output in the browser and make the judgment there. Any separate reproduction is done only in an approved isolated environment.

2What permissions and environment must you confirm before the lab?

Reading in the browser and writing a work plan only. No changes to real equipment or customer traffic.

3What evidence did you record in the previous unit, "Requirements and architecture design"?

You succeed when you link requirement R1 to the unmet boundary and propose either separate placement or an approved requirement change, along with a verification test.

TEXTBOOK GUIDE

Main text that covers each concept from its background to the criteria for judging it

We explain the material section by section so readers new to IT can connect causes and effects without memorizing terms.

  1. Explain the components and failure boundaries of build and acceptance testing using a diagram.
  2. Judge the state of build and acceptance testing from command output and observed values.
  3. Document the stop conditions and recovery evidence for build and acceptance testing in a work record.
Build and acceptance testing Lab environment and safety boundaries
HardwareFixture bundle for 2-node design, acceptance and fault evidence
SoftwareJSON work records and Kubernetes API v1 examples
Required permissionsReading in the browser and writing a work plan only
NetworkingNo changes to real equipment or customer traffic

Reviewed against official documentation and training output. Commands and performance tests on real hardware are unconfirmed.

Applies to version: Kubernetes API v1 · Training fixture 2026.2 · Manuscript review date: 2026-09-01

CONCEPT FLOW

How the chapters connect

The chapters are not isolated short answers to memorize. Follow them from left to right to see how each chapter's concepts support the next decision.

  1. 1.Start the checks at the design revision
  2. 2.Pins the lab target for build evidence
  3. 3.Distinguish the output of the acceptance test from what it means
  4. 4.Make the go/stop decision on the acceptance verdict
  5. 5.Re-verify recovery for build and acceptance testing
Build and acceptance testing: the overall map. If you lose track while reading the detailed explanations and chapters below, return to this sequence.

CONTROLLED EXPLANATION

Follow the evidence to check, one step at a time

Current explanation · 1/5 · Start the checks at the design revision

Up next: Pins the lab target for build evidence

  1. Start the checks at the design revision

    Do not guess the cause and start by changing settings. If you group the following evidence into records from the same time window, another operator can reproduce the boundary at which the expected state broke.

  2. Pins the lab target for build evidence

    Lab scenario:: Read the test list below and build a table showing whether the system can be accepted and what evidence is missing. Do not operate a real cluster. Instructions:: In the browser, read the training output below and write a verdict. Do not send the commands to real equipment. To reproduce the commands separately, prepare an approved isolated environment with the relevant tools and example files. Save the entire output, and if a test was not run or the target revision does not match, do not move on to the next change.

  3. Distinguish the output of the acceptance test from what it means

    The point is not to memorize the values themselves but to confirm that the A2 recovery test is still outstanding, so full acceptance cannot be completed. The values shown are reproduced examples for training, not measurements taken on real equipment. Identifiers and values can differ by device, driver, and cluster.

  4. Make the go/stop decision on the acceptance verdict

    Success means attaching an actual evidence file to each requirement and setting the A2 owner, isolated environment, success criteria, and retest time. Record the execution time, target identity, commands used, key output, verdict, and next action together in the result.

  5. Re-verify recovery for build and acceptance testing

    Fix only the failing layer, but review the impact on dependencies. Re-run that test and the affected regression tests on the new revision, and also preserve the original failure record. After recovery, measure again with the same commands and the same success criteria. Do not close an incident just because things appear normal.

Conceptual explanation 01

Accept without recording tests that were never run as passed

Acceptance: a procedure for deciding whether operational acceptance is possible by comparing requirements against actual test evidence.

Acceptance does not judge whether installation commands finished; it judges whether the promised functions and failure boundaries have been demonstrated. The identity of every layer, from the equipment inventory through the host, fabric, storage, cluster, and model API, must be linked in a single release record.

If you fix the requirement ID, environment revision, input, command, output, and pass criteria for each test, you can reproduce failures as well as successes. Performance, security denial, and backup restore are separate tests. Do not use a functional success as substitute evidence for any of those three.

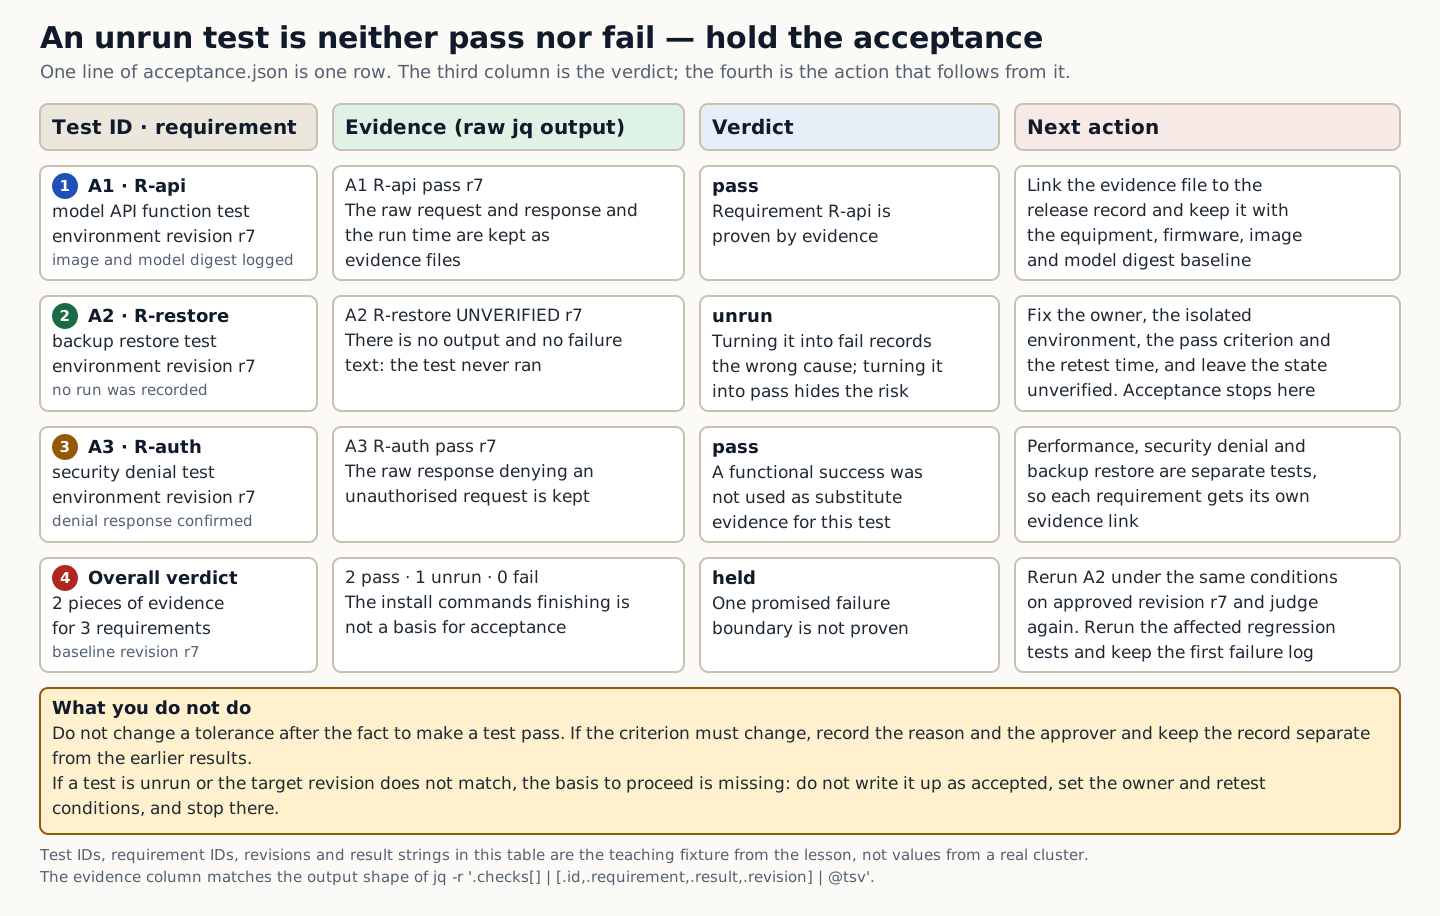
In the fixture, functional test A1 passed but recovery test A2 was not run. Marking a not-run test as fail records the wrong cause, and marking it pass hides the risk. Leave it as unconfirmed, assign an owner and retest conditions, and hold acceptance.

Read the test list below and build a table showing whether the system can be accepted and what evidence is missing. Do not operate a real cluster.

A table that splits the A1, A2, and A3 tests from acceptance.json into evidence, verdict, and next action, and holds overall acceptance because A2 was not run.
How to read the figure Complete acceptance without turning an unrun test into a success. Each line of acceptance.json is one row of the table, and badges 1 to 4 on the left give the order. The first column is the test ID and requirement, the second is the raw jq output as evidence, the third is the verdict, and the fourth is the action that follows from that verdict. A1 and A3 pass, while A2 has neither output nor failure text and is therefore UNVERIFIED, that is, not run. Recording an unrun test as fail misstates the cause, and recording it as pass hides the risk, so the fourth row holds overall acceptance because there is evidence for only 2 of the 3 requirements. The last amber box is the prohibition on changing tolerances after the fact, and the two gray lines below it describe the nature of the values and the output format of the evidence column. The test IDs, requirement IDs, revisions, and result strings in the table are a training fixture, not values obtained from a real cluster. Source: composed by the author based on Kubernetes Liveness, Readiness and Startup Probes · K3s Backup and Restore · NVIDIA Triton Metrics.
Why does this happen?
If you fix the requirement ID, environment revision, input, command, output, and pass criteria for each test, you can reproduce failures as well as successes. Performance, security denial, and backup restore are separate tests. Do not use a functional success as substitute evidence for any of those three.
When is it a problem?
If tests were not run or the target revision does not match, there are insufficient grounds to proceed.
Common beginner misconceptions
Do not change the tolerance after the fact to make a test pass. If a criterion must change, record the reason and the approver, and keep it separate from the existing results.
How to verify it yourself
Record the equipment, firmware, image, and model digests in the baseline. Link design requirements to test IDs one-to-one, or explicitly many-to-one.
To summarize this sectionYou succeed when you attach a real evidence file to each requirement and set the A2 owner, the isolated environment, the success criteria, and the retest time.

CHAPTER 1 / 5

Start the checks at the design revision

Do not guess the cause and start by changing settings. If you group the following evidence into records from the same time window, another operator can reproduce the boundary at which the expected state broke.

1. Record the equipment, firmware, image, and model digests in the baseline. 2. Map design requirements to test IDs one-to-one, or explicitly many-to-one. 3. Distinguish pass, fail, and not-run, and preserve the original failure text. 4. Re-run the test under the same conditions and on the approved revision.

CHAPTER 2 / 5

Pins the lab target for build evidence

Commands for reproducing the isolated environment · do not run them in the browser
jq -r '.checks[] | [.id,.requirement,.result,.revision] | @tsv' acceptance.json

CHAPTER 3 / 5

Distinguish the output of the acceptance test from what it means

Expected output for training · not an actual measurement
A1	R-api	pass	r7
A2	R-restore	UNVERIFIED	r7
A3	R-auth	pass	r7

CHAPTER 4 / 5

Make the go/stop decision on the acceptance verdict

CHAPTER 5 / 5

Re-verify recovery for build and acceptance testing

CONCRETE CASES

Read the test list below and build a table showing whether the system can be accepted and what evidence is missing. Do not operate a real cluster.

In the fixture, functional test A1 passed but recovery test A2 was not run. Marking a not-run test as fail records the wrong cause, and marking it pass hides the risk. Leave it as unconfirmed, assign an owner and retest conditions, and hold acceptance.

Wrong responses and boundaries to check

Do not change the tolerance after the fact to make a test pass. If a criterion must change, record the reason and the approver, and keep it separate from the existing results.

Fix only the failing layer, but review the impact on dependencies. Re-run that test and the affected regression tests on the new revision, and also preserve the original failure record. After recovery, measure again with the same commands and the same success criteria. Do not close an incident just because things appear normal.

INTERACTIVE LAB 1 / 2

Lab 1 · Find the basis for a verdict in the output

Enter values in the browser and check the execution results and the failure and recovery paths. No commands are ever sent to real equipment or the NAS.

Lab scenario:: Read the test list below and build a table showing whether the system can be accepted and what evidence is missing. Do not operate a real cluster. Instructions:: In the browser, read the training output below and write a verdict. Do not send the commands to real equipment. To reproduce the commands separately, prepare an approved isolated environment with the relevant tools and example files. Save the entire output, and if a test was not run or the target revision does not match, do not move on to the next change.

A1	R-api	pass	r7
A2	R-restore	UNVERIFIED	r7
A3	R-auth	pass	r7

The point is not to memorize the values themselves but to confirm that the A2 recovery test is still outstanding, so full acceptance cannot be completed. The values shown are reproduced examples for training, not measurements taken on real equipment. Identifiers and values can differ by device, driver, and cluster.

INTERACTIVE LAB 2 / 2

Lab 2 · Plan for stopping and recovery

Enter values in the browser and check the execution results and the failure and recovery paths. No commands are ever sent to real equipment or the NAS.

Do not change the tolerance after the fact to make a test pass. If a criterion must change, record the reason and the approver, and keep it separate from the existing results.

KEY TERMS

Key terms in this unit

Acceptance
A procedure for deciding whether operational acceptance is possible by comparing requirements against actual test evidence.

UNIT WORKBOOK

Exercises and worksheets for applying concepts to new situations

Start by checking basic principles, then expand to practical workplace decisions. After submitting an answer, you can see why every option is correct or incorrect, not just the correct answer.

Document the stop conditions and recovery evidence for build and acceptance testing in a work record.

PERSONAL WORKSHEET

A learning worksheet you adapt to your own environment

Your input remains only on the current browser screen and is not stored or transmitted externally. Use categories and pseudonyms instead of actual sensitive information.

OFFICIAL SOURCES

Verify against official sources

Reviewed against official documentation and training output. Commands and performance tests on real hardware are unconfirmed.

CORE UNIT 3 / 3

Incident recovery and operational handover

Judge Go/No-Go based on fault injection, recovery, the postmortem, the runbook, and the handover.

Difficulty
Intermediate
Structure
Lessons 5 · Labs 2 · Assessment

Diagrams and tables: composed by the author using each lesson's official primary sources. Find the originals and review dates at the end of that lesson.

PREREQUISITE CHECK

Three things to check before reading

This is not a test of memorized answers. Think about each question first, then open the explanation to review the foundational concepts used in this course.

1Does this unit send commands to real equipment?

No. Read the training output in the browser and make the judgment there. Any separate reproduction is done only in an approved isolated environment.

2What permissions and environment must you confirm before the lab?

Reading in the browser and writing a work plan only. No changes to real equipment or customer traffic.

3What evidence did you record in the previous unit, "Build-out and acceptance testing"?

Success means attaching an actual evidence file to each requirement and setting the A2 owner, isolated environment, success criteria, and retest time.

TEXTBOOK GUIDE

Main text that covers each concept from its background to the criteria for judging it

We explain the material section by section so readers new to IT can connect causes and effects without memorizing terms.

  1. Explain the components and failure boundaries of incident recovery and operational handover using a diagram.
  2. Judge the state of incident recovery and operational handover from command output and observed values.
  3. Document the stop conditions and recovery evidence for incident recovery and operational handover in a work record.
Incident recovery and operational handover Lab environment and safety boundaries
HardwareFixture bundle for 2-node design, acceptance and fault evidence
SoftwareJSON work records and Kubernetes API v1 examples
Required permissionsReading in the browser and writing a work plan only
NetworkingNo changes to real equipment or customer traffic

Reviewed against official documentation and training output. Commands and performance tests on real hardware are unconfirmed.

Applies to version: Kubernetes API v1 · Training fixture 2026.2 · Manuscript review date: 2026-09-01

CONCEPT FLOW

How the chapters connect

The chapters are not isolated short answers to memorize. Follow them from left to right to see how each chapter's concepts support the next decision.

  1. 1.Start the checks at the healthy baseline
  2. 2.Fix the lab target for the incident record
  3. 3.Distinguish the output of the shift reproduction from its meaning
  4. 4.Make the go/stop decision on handover approval
  5. 5.Re-verify recovery of incident recovery and operational handover
Incident recovery and operational handover: the overall map. If you lose track while reading the detailed explanations and chapters below, return to this sequence.

CONTROLLED EXPLANATION

Follow the evidence to check, one step at a time

Current explanation · 1/5 · Start the checks at the healthy baseline

Up next: Fix the lab target for the incident record

  1. Start the checks at the healthy baseline

    Do not guess the cause and start by changing settings. If you group the following evidence into records from the same time window, another operator can reproduce the boundary at which the expected state broke.

  2. Fix the lab target for the incident record

    Lab scenario:: Read the shift test results, decide whether the handover can be closed, and write how to close the gaps without widening permissions. Instructions:: In the browser, read the training output below and write a verdict. Do not send the commands to real equipment. To reproduce the commands separately, prepare an approved isolated environment with the relevant tools and example files. Save the entire output, and if permissions, keys, an owner, or reproduction evidence is missing, do not move on to the next change.

  3. Distinguish the output of the shift reproduction from its meaning

    The point is not to memorize the values themselves but to confirm that a successful dashboard query does not substitute for key access and the ability to restore. The values shown are reproduced examples for training, not measurements taken on real equipment. Identifiers and values can differ by device, driver, and cluster.

  4. Make the go/stop decision on handover approval

    You succeed when you put the handover on hold and set auditable key access, a break-glass path, a retest of shift roles, and confirmation by the accountable owner as the completion conditions. Record the execution time, target identity, commands used, key output, verdict, and next action together in the result.

  5. Re-verify recovery of incident recovery and operational handover

    If the handover test fails, keep the existing operations owner and fix the failed items. After the new owner reproduces the steps from the same document, record the time of the ownership transfer and the remaining risks. After recovery, measure again with the same commands and the same success criteria. Do not close an incident just because things appear normal.

Conceptual explanation 01

Complete the handover based on the receiving owner's own reproduction

Handover: the process of passing on authority, procedures, and responsibility so that the next person on duty can reproduce the status checks and the response.

A handover document must tell the next owner what to do first, not just list equipment. Ownership stays unbroken through an incident only when the document includes the current revision, the healthy baseline, alerts, permissions, backup locations, stop criteria, and the escalation path.

When the person taking over reproduces the read-only queries and the isolated restore themselves, gaps among the document, the permissions, and the real environment become visible. If the author performs the steps for them, those gaps stay hidden. A handover test is a procedure in which the recipient works from the document and records where they got stuck.

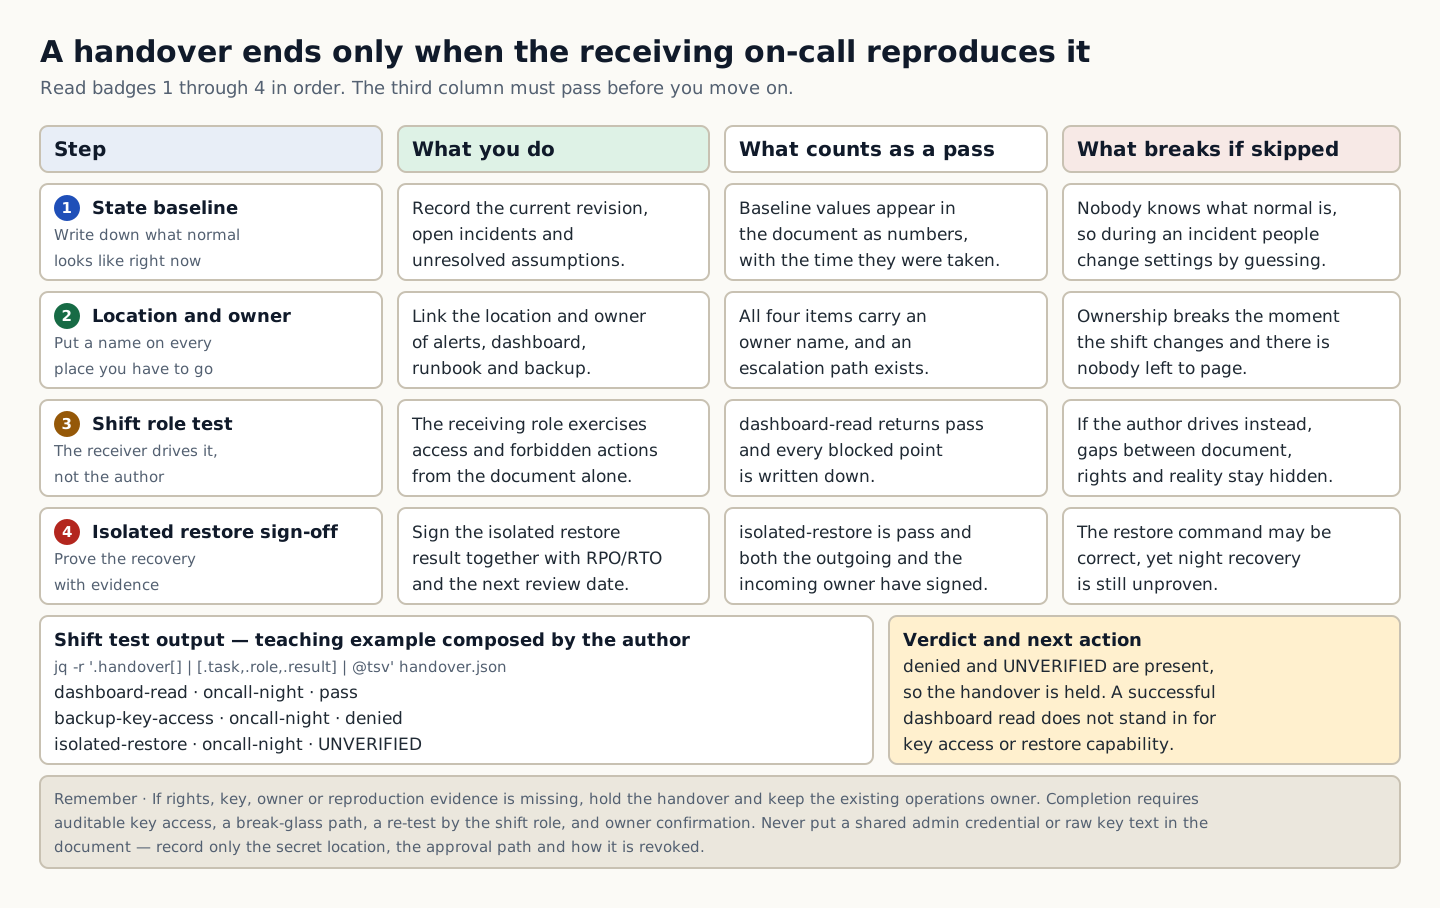
In the training incident the restore command was correct, but the night-shift operator had no access to the backup key. A success record from the day-shift operator cannot prove night-time recovery capability. Least privilege and the break-glass procedure must be tested with the actual shift roles.

Read the shift test results, judge whether the handover can close, and write how to fill the gaps without widening permissions.

A handover checklist. It shows four steps (state baseline, location and owner, shift role test, and isolated restore sign-off) with their pass criteria, and holds the handover based on the denied and UNVERIFIED lines in the shift test output.
How to read the figure The handover closes with the receiving operator's reproduction results. Read the table top to bottom from badge 1 to badge 4, and read each row across as what to do, what counts as a pass, and what breaks if the step is skipped. If the pass criterion in the third column is not met, do not move on to the next step. The lower-left box is the shift test output extracted with jq: dashboard-read is pass, backup-key-access is denied, and isolated-restore is UNVERIFIED. The box on the right is the verdict to hold the handover based on those three lines, meaning that a successful dashboard read does not substitute for key access or restore capability. The band at the bottom states the rule that the existing operations owner stays in place if any of permissions, key, owner, or reproduction evidence is missing, along with the prohibition on writing secrets in the document. Colors only separate the columns and do not indicate ranking, so the figure can be read without distinguishing them. The identifiers and status strings in the table are training examples composed by the author, not values measured on real equipment. Source: composed by the author based on Google SRE Workbook: Incident Response · Kubernetes Using RBAC Authorization · K3s Backup and Restore.
Why does this happen?
When the person taking over reproduces the read-only queries and the isolated restore themselves, gaps among the document, the permissions, and the real environment become visible. If the author performs the steps for them, those gaps stay hidden. A handover test is a procedure in which the recipient works from the document and records where they got stuck.
When is it a problem?
If permissions, keys, an owner, or reproduction evidence are missing, there are insufficient grounds to proceed.
Common beginner misconceptions
Do not put shared admin credentials or raw key material into the document to make the handover easier. Record only the secret location, the approval path, and the revocation method.
How to verify it yourself
Write down the current state, open incidents, and unresolved assumptions. Link the locations and owners of alerts, dashboards, runbooks, and backups.
To summarize this sectionYou succeed when you put the handover on hold and set auditable key access, a break-glass path, a retest of shift roles, and confirmation by the accountable owner as the completion conditions.

CHAPTER 1 / 5

Start the checks at the healthy baseline

Do not guess the cause and start by changing settings. If you group the following evidence into records from the same time window, another operator can reproduce the boundary at which the expected state broke.

1. Write down the current state, open incidents, and unresolved assumptions. 2. Link the alerts, dashboards, runbooks, and backups to their locations and owners. 3. Test the access and the prohibited actions of the role being handed over. 4. Sign off on the isolated recovery result together with the RPO/RTO and the next inspection date.

CHAPTER 2 / 5

Fix the lab target for the incident record

Commands for reproducing the isolated environment · do not run them in the browser
jq -r '.handover[] | [.task,.role,.result] | @tsv' handover.json

CHAPTER 3 / 5

Distinguish the output of the shift reproduction from its meaning

Expected output for training · not an actual measurement
dashboard-read	oncall-night	pass
backup-key-access	oncall-night	denied
isolated-restore	oncall-night	UNVERIFIED

CHAPTER 4 / 5

Make the go/stop decision on handover approval

CHAPTER 5 / 5

Re-verify recovery of incident recovery and operational handover

CONCRETE CASES

Read the shift test results, judge whether the handover can close, and write how to fill the gaps without widening permissions.

In the training incident the restore command was correct, but the night-shift operator had no access to the backup key. A success record from the day-shift operator cannot prove night-time recovery capability. Least privilege and the break-glass procedure must be tested with the actual shift roles.

Wrong responses and boundaries to check

Do not put shared admin credentials or raw key material into the document to make the handover easier. Record only the secret location, the approval path, and the revocation method.

If the handover test fails, keep the existing operations owner and fix the failed items. After the new owner reproduces the steps from the same document, record the time of the ownership transfer and the remaining risks. After recovery, measure again with the same commands and the same success criteria. Do not close an incident just because things appear normal.

INTERACTIVE LAB 1 / 2

Lab 1 · Find the basis for a verdict in the output

Enter values in the browser and check the execution results and the failure and recovery paths. No commands are ever sent to real equipment or the NAS.

Lab scenario:: Read the shift test results, decide whether the handover can be closed, and write how to close the gaps without widening permissions. Instructions:: In the browser, read the training output below and write a verdict. Do not send the commands to real equipment. To reproduce the commands separately, prepare an approved isolated environment with the relevant tools and example files. Save the entire output, and if permissions, keys, an owner, or reproduction evidence is missing, do not move on to the next change.

dashboard-read	oncall-night	pass
backup-key-access	oncall-night	denied
isolated-restore	oncall-night	UNVERIFIED

The point is not to memorize the values themselves but to confirm that a successful dashboard query does not substitute for key access and the ability to restore. The values shown are reproduced examples for training, not measurements taken on real equipment. Identifiers and values can differ by device, driver, and cluster.

INTERACTIVE LAB 2 / 2

Lab 2 · Plan for stopping and recovery

Enter values in the browser and check the execution results and the failure and recovery paths. No commands are ever sent to real equipment or the NAS.

Do not put shared admin credentials or raw key material into the document to make the handover easier. Record only the secret location, the approval path, and the revocation method.

KEY TERMS

Key terms in this unit

Handover
The process of handing over permissions, procedures and responsibility so the next operator can reproduce the checks and the response.

UNIT WORKBOOK

Exercises and worksheets for applying concepts to new situations

Start by checking basic principles, then expand to practical workplace decisions. After submitting an answer, you can see why every option is correct or incorrect, not just the correct answer.

Document the stop conditions and recovery evidence for incident recovery and operational handover in a work record.

PERSONAL WORKSHEET

A learning worksheet you adapt to your own environment

Your input remains only on the current browser screen and is not stored or transmitted externally. Use categories and pseudonyms instead of actual sensitive information.

OFFICIAL SOURCES

Verify against official sources

Reviewed against official documentation and training output. Commands and performance tests on real hardware are unconfirmed.

DECISION ACTIVITY

The functional test passed, but there is no restore test and no confirmation of access for the next-shift operator. What is the acceptance verdict?

First write down the evidence you need and the stop criteria, then choose a verdict.

Choose an answer

THREE-LEVEL ASSESSMENT

From basic principles to operational decisions

When you submit an answer you can see why every option is right or wrong.

Basic Question 1

What is the purpose of separating failure domains in a design?

Choose an answer
Apply Question 2

What must you keep for an acceptance test to be repeatable?

Choose an answer
Capstone Question 3

What is the strongest evidence that the post-incident handover is complete?

Choose an answer

LEARNING RECORD

Have you reviewed the text, decision activities, and all explanations?

Completion status is stored only in this browser.