KoreaDevKNOWLEDGE SHARING

Content typeLearn

AI INFRASTRUCTURE · 06 / 12

Containers and registries

Understand OCI images and the container runtime, and operate reproducible builds, SBOMs, signing, registries, and air-gapped imports.

Difficulty
Intermediate
Structure
Core units 3 · Judgment activities · Three-stage assessment

NEW HIRE ONBOARDING

Start in the order you would receive your first assignment

So that even a new hire with no prior IT background can follow along, we start with the situation, the task, the evidence, and when to report, before difficult definitions.

  1. 01

    Read the situation in one sentence

    Tie the image manifest, layers, runtime isolation, SBOM, signature, registry, and air-gapped chain of custody to one digest.

  2. 02

    Today's assignment

    Write the stop conditions and recovery evidence for Registry operations and air-gapped import into a work record.

  3. 03

    Evidence that shows the work is complete

    Reviewed against official documentation and training output. Commands and performance tests on real hardware are unconfirmed.

  4. 04

    When to stop and ask a senior colleague

    After the deployment was approved, the digest of the `model-api:prod` tag changed. What do you do?

Unpack unfamiliar terms first

OCI(Open Container Initiative)
A project that defines container interoperability specifications such as image, runtime, and distribution.

Operational question for this course

How do you carry over the same digest and supply chain evidence, rather than just the same tag?

Tie the image manifest, layers, runtime isolation, SBOM, signature, registry, and air-gapped chain of custody to one digest.

CORE UNIT 1 / 3

OCI images and the container runtime

Explain the image, layer, and digest as well as the process isolation boundary.

Difficulty
Intermediate
Structure
Lessons 5 · Labs 2 · Assessment

Diagrams and tables: composed by the author using each lesson's official primary sources. Find the originals and review dates at the end of that lesson.

PREREQUISITE CHECK

Three things to check before reading

This is not a test of memorized answers. Think about each question first, then open the explanation to review the foundational concepts used in this course.

1Does this unit send commands to real equipment?

No. Read the training output in the browser and make the judgment there. Any separate reproduction is done only in an approved isolated environment.

2What permissions and environment must you confirm before the lab?

Rootless first, registry project administrator. TLS registry and isolated air-gap staging.

3How do you record a value you have never seen before and a test you have not yet run?

Record it as unconfirmed. Distinguish expected training output from actual measurements, and do not fill in blanks with unapproved work.

TEXTBOOK GUIDE

Main text that covers each concept from its background to the criteria for judging it

We explain the material section by section so readers new to IT can connect causes and effects without memorizing terms.

  1. Explain the components and failure boundaries of OCI images and the container runtime with a diagram.
  2. Judge the state of OCI images and the container runtime from command output and observed values.
  3. Write the stop conditions and recovery evidence for OCI images and the container runtime into a work record.
OCI images and the container runtime Lab environment and safety boundaries
Hardwarecontainer host·private registry fixture
SoftwareUbuntu 24.04·containerd 1.7·Docker/BuildKit·cosign
Required permissionsRootless first, registry project administrator
NetworkingTLS registry and isolated air-gap staging

Reviewed against official documentation and training output. Commands and performance tests on real hardware are unconfirmed.

Applies to version: OCI Image Specification 1.1.x · containerd 1.7.x fixture · Manuscript review date: 2026-09-01

CONCEPT FLOW

How the chapters connect

The chapters are not isolated short answers to memorize. Follow them from left to right to see how each chapter's concepts support the next decision.

  1. 1.Start the check at the image index
  2. 2.Pins down the lab target for the manifest
  3. 3.Distinguishes runtime bundle output from its meaning
  4. 4.Decides whether the container proceeds or stops
  5. 5.Re-verify recovery of OCI images and the container runtime
OCI images and the container runtime: the overall map. If you lose track while reading the detailed explanations and chapters below, return to this sequence.

CONTROLLED EXPLANATION

Follow the evidence to check, one step at a time

Current explanation · 1/5 · Start the check at the image index

Up next: Pins down the lab target for the manifest

  1. Start the check at the image index

    Do not guess the cause and start by changing settings. If you group the following evidence into records from the same time window, another operator can reproduce the boundary at which the expected state broke.

  2. Pins down the lab target for the manifest

    Lab scenario:: In a multi-architecture image fixture, find the amd64 manifest digest and check the cgroup limit of the running container. Instructions:: In the browser, read the training output below and write a verdict. Do not send the commands to real equipment. To reproduce the commands separately, prepare an approved isolated environment with the relevant tools and example files. Save the entire output, and if the digest, platform, or permission contract does not match, do not move on to the next change.

  3. Distinguishes runtime bundle output from its meaning

    The point is not to memorize the values themselves but to confirm that the selected platform digest and the runtime resource contract match the approved values. The values shown are reproduced examples for training, not measurements taken on real equipment. Identifiers and values can differ by device, driver, and cluster.

  4. Decides whether the container proceeds or stops

    Success means tracing index → manifest → config/layer → bundle → process with real digests and runtime information. Record the execution time, target identity, commands used, key output, verdict, and next action together in the result.

  5. Re-verify recovery of OCI images and the container runtime

    If the platform or permissions are wrong, remove the container from the deployment and revert to the approved digest. Do not edit runtime state by hand; replace the declarative workload revision instead. After recovery, measure again with the same commands and the same success criteria. Do not close an incident just because things appear normal.

Conceptual explanation 01

Identify the boundary at which an OCI artifact runs as a host process

OCI (Open Container Initiative): a project that defines container interoperability specifications such as image, runtime, and distribution.

An OCI image is a content-addressed graph of a manifest, an optional index, a configuration, and filesystem layer descriptors. A container is a process run from the root filesystem and execution configuration derived from this image, within host isolation mechanisms such as namespaces and cgroups.

Treating an image and a container as the same thing confuses changes in the writable layer with a reproducible artifact. Namespaces provide the scope of what is visible and cgroups provide resource accounting and limits, but a container does not have its own kernel.

A security boundary does not arise from the image format alone. Look at the capabilities, seccomp, mounts and user in the runtime config together with host kernel vulnerabilities.

In the training example an image index containing both amd64 and arm64 was misread as a single amd64 manifest. The index digest and the platform manifest digests inside it point to different content. You can only trace down to the actual layers once you know which platform the executing node selected. Files created inside a container are separate from the immutable layers of the image, so do not assume they persist in a new instance.
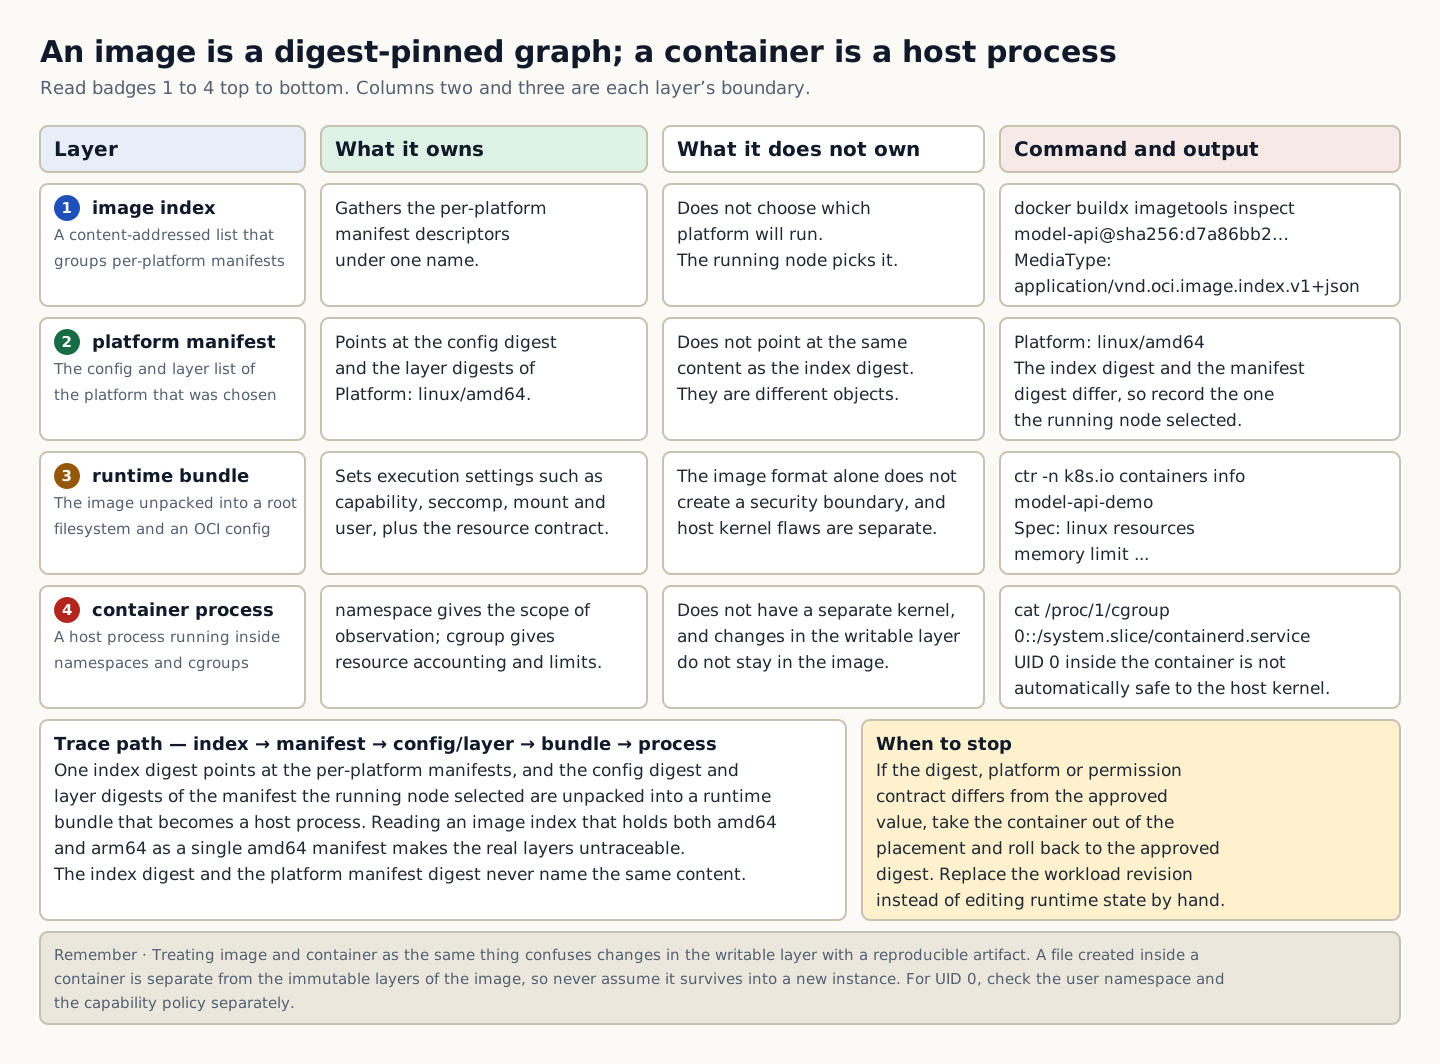
An OCI layer table. It sets side by side what each of four layers (image index, platform manifest, runtime bundle, and container process) owns and does not own, together with the command that checks each layer and its output.
How to read the figure Distinguish the boundaries at which an OCI artifact becomes a running host process. Read the table from badge 1 to badge 4, top to bottom; in each row, the second and third columns are that layer's boundary of responsibility, and the fourth column is the command and output that confirm it. In row 1, the image index collects per-platform manifest descriptors, but the executing node chooses which platform to run, and the output is MediaType: application/vnd.oci.image.index.v1+json. In row 2, the platform manifest points to the config digest and layer digests for Platform: linux/amd64, and its content is not the same as the index digest. In row 3, the runtime bundle defines the capability, seccomp, mount, user, and resource contract, but the image format alone does not create a security boundary. In row 4, the container process is a host process running inside namespaces and cgroups with no separate kernel, and the output of cat /proc/1/cgroup is 0::/system.slice/containerd.service. The lower-left box shows the trace path from index to process, and the right box gives the stop condition: if the digest, platform, or permission contract differs from the approved value, remove the container from placement and roll back to the approved digest. Colors only distinguish columns, so the figure can be read without distinguishing colors, and the digests and output strings in the table are training examples composed by the author, not values measured on real equipment. Source: composed by the author based on OCI Image Format Specification · OCI Runtime Specification.
Why does this happen?
Treating an image and a container as the same thing confuses changes in the writable layer with a reproducible artifact. Namespaces provide the scope of visibility and cgroups provide resource accounting and limits, but a container does not have its own kernel.
When is it a problem?
If you see a mismatch in the digest, platform, or permission contract, there are insufficient grounds to proceed.
Common beginner misconceptions
UID 0 inside a container does not automatically become safe from the host kernel's point of view. Check the user namespace and capability policies separately.
How to verify it yourself
Resolve the image reference by tag and by digest separately. Check the platform, config, and layer digests in the manifest.
To summarize this sectionYou succeed when you trace index→manifest→config/layer→bundle→process using real digests and runtime information.

CHAPTER 1 / 5

Start the check at the image index

Do not guess the cause and start by changing settings. If you group the following evidence into records from the same time window, another operator can reproduce the boundary at which the expected state broke.

1. Resolve the image reference by tag and by digest separately. 2. Check the platform, config, and layer digests in the manifest. 3. Record the snapshot and the OCI config the runtime selected. 4. Check the namespace, cgroup, and capabilities of the process and what it shares with the host kernel.
CHAPTER 2 / 5

Pins down the lab target for the manifest

Commands for reproducing the isolated environment · do not run them in the browser
docker buildx imagetools inspect registry.example/model-api@sha256:d7a86bb2b809b36b1f8f0b1172c34c9d40c1d7daa596cd90fb5fd2dd7dd34d83
ctr -n k8s.io containers info model-api-demo
cat /proc/1/cgroup

CHAPTER 3 / 5

Distinguishes runtime bundle output from its meaning

Expected output for training · not an actual measurement
Name: registry.example/model-api@sha256:d7a86bb2b809b36b1f8f0b1172c34c9d40c1d7daa596cd90fb5fd2dd7dd34d83
MediaType: application/vnd.oci.image.index.v1+json
Platform: linux/amd64
Spec: linux resources memory limit ...
0::/system.slice/containerd.service

CHAPTER 4 / 5

Decides whether the container proceeds or stops

CHAPTER 5 / 5

Re-verify recovery of OCI images and the container runtime

CONCRETE CASES

In a multi-architecture image fixture, find the amd64 manifest digest and check the cgroup limits of the running container.

A security boundary does not arise from the image format alone. Look at the capabilities, seccomp, mounts and user in the runtime config together with host kernel vulnerabilities.

Wrong responses and boundaries to check

UID 0 inside a container is not automatically safe from the host kernel's point of view. Check the user namespace and capability policy separately.

If the platform or permissions are wrong, remove the container from the deployment and revert to the approved digest. Do not edit runtime state by hand; replace the declarative workload revision instead. After recovery, measure again with the same commands and the same success criteria. Do not close an incident just because things appear normal.

INTERACTIVE LAB 1 / 2

Lab 1 · Find the basis for a verdict in the output

Enter values in the browser and check the execution results and the failure and recovery paths. No commands are ever sent to real equipment or the NAS.

Lab scenario:: In a multi-architecture image fixture, find the amd64 manifest digest and check the cgroup limit of the running container. Instructions:: In the browser, read the training output below and write a verdict. Do not send the commands to real equipment. To reproduce the commands separately, prepare an approved isolated environment with the relevant tools and example files. Save the entire output, and if the digest, platform, or permission contract does not match, do not move on to the next change.

Name: registry.example/model-api@sha256:d7a86bb2b809b36b1f8f0b1172c34c9d40c1d7daa596cd90fb5fd2dd7dd34d83
MediaType: application/vnd.oci.image.index.v1+json
Platform: linux/amd64
Spec: linux resources memory limit ...
0::/system.slice/containerd.service

The point is not to memorize the values themselves but to confirm that the selected platform digest and the runtime resource contract match the approved values. The values shown are reproduced examples for training, not measurements taken on real equipment. Identifiers and values can differ by device, driver, and cluster.

INTERACTIVE LAB 2 / 2

Lab 2 · Plan for stopping and recovery

Enter values in the browser and check the execution results and the failure and recovery paths. No commands are ever sent to real equipment or the NAS.

UID 0 inside a container is not automatically safe from the host kernel's point of view. Check the user namespace and capability policy separately.

KEY TERMS

Key terms in this unit

OCI(Open Container Initiative)
A project that defines container interoperability specifications such as image, runtime, and distribution.

UNIT WORKBOOK

Exercises and worksheets for applying concepts to new situations

Start by checking basic principles, then expand to practical workplace decisions. After submitting an answer, you can see why every option is correct or incorrect, not just the correct answer.

Write the stop conditions and recovery evidence for OCI images and the container runtime into a work record.

PERSONAL WORKSHEET

A learning worksheet you adapt to your own environment

Your input remains only on the current browser screen and is not stored or transmitted externally. Use categories and pseudonyms instead of actual sensitive information.

OFFICIAL SOURCES

Verify against official sources

Reviewed against official documentation and training output. Commands and performance tests on real hardware are unconfirmed.

CORE UNIT 2 / 3

Build and the software supply chain

Tie the Dockerfile, cache, SBOM, scan, and signature to the same digest.

Difficulty
Intermediate
Structure
Lessons 5 · Labs 2 · Assessment

Diagrams and tables: composed by the author using each lesson's official primary sources. Find the originals and review dates at the end of that lesson.

PREREQUISITE CHECK

Three things to check before reading

This is not a test of memorized answers. Think about each question first, then open the explanation to review the foundational concepts used in this course.

1Does this unit send commands to real equipment?

No. Read the training output in the browser and make the judgment there. Any separate reproduction is done only in an approved isolated environment.

2What permissions and environment must you confirm before the lab?

Rootless first, registry project administrator. TLS registry and isolated air-gap staging.

3What evidence did you record in the previous unit, "OCI images and container runtime"?

Success means tracing index → manifest → config/layer → bundle → process with real digests and runtime information.

TEXTBOOK GUIDE

Main text that covers each concept from its background to the criteria for judging it

We explain the material section by section so readers new to IT can connect causes and effects without memorizing terms.

  1. Explain the components and failure boundaries of build and the software supply chain using a diagram.
  2. Judge the state of build and the software supply chain from command output and observed values.
  3. Document the stop conditions and recovery evidence for build and the software supply chain in a work record.
Build and the software supply chain Lab environment and safety boundaries
Hardwarecontainer host·private registry fixture
SoftwareUbuntu 24.04·containerd 1.7·Docker/BuildKit·cosign
Required permissionsRootless first, registry project administrator
NetworkingTLS registry and isolated air-gap staging

Reviewed against official documentation and training output. Commands and performance tests on real hardware are unconfirmed.

Applies to version: OCI Image Specification 1.1.x · containerd 1.7.x fixture · Manuscript review date: 2026-09-01

CONCEPT FLOW

How the chapters connect

The chapters are not isolated short answers to memorize. Follow them from left to right to see how each chapter's concepts support the next decision.

  1. 1.Start the check at the source input
  2. 2.Pins the lab target for the isolated build
  3. 3.Distinguish the output of the artifact evidence from what it means
  4. 4.Decide whether to proceed or stop at signature approval
  5. 5.Re-verify recovery of build and the software supply chain
Build and the software supply chain: the overall map. If you lose track while reading the detailed explanations and chapters below, return to this sequence.

CONTROLLED EXPLANATION

Follow the evidence to check, one step at a time

Current explanation · 1/5 · Start the check at the source input

Up next: Pins the lab target for the isolated build

  1. Start the check at the source input

    Do not guess the cause and start by changing settings. If you group the following evidence into records from the same time window, another operator can reproduce the boundary at which the expected state broke.

  2. Pins the lab target for the isolated build

    Lab scenario:: Fix a Dockerfile with a mutable base tag and a token left inside the image, then build an approvable evidence list. Instructions:: In the browser, read the training output below and write a verdict. Do not send the commands to real equipment. To reproduce the commands separately, prepare an approved isolated environment with the relevant tools and example files. Save the entire output, and if you see an unpinned base, secret exposure, or a signature failure, do not move on to the next change.

  3. Distinguish the output of the artifact evidence from what it means

    The point is not to memorize the values themselves but to confirm that the build metadata, SBOM, and signature all point to the same immutable digest. The values shown are reproduced examples for training, not measurements taken on real equipment. Identifiers and values can differ by device, driver, and cluster.

  4. Decide whether to proceed or stop at signature approval

    Success means submitting an unbroken evidence chain from the source revision through the image digest, SBOM, scan, provenance, and signature. Record the execution time, target identity, commands used, key output, verdict, and next action together in the result.

  5. Re-verify recovery of build and the software supply chain

    If the digest or the signature differs, stop the release and preserve the build cache and the registry events. Produce a new digest from pinned inputs on a trusted builder and re-run the full policy. After recovery, measure again with the same commands and the same success criteria. Do not close an incident just because things appear normal.

Conceptual explanation 01

Trace from the source revision to the signed image digest

SBOM (Software Bill of Materials): a description of the components in an artifact; on its own, it guarantees neither the absence of vulnerabilities nor trustworthiness.

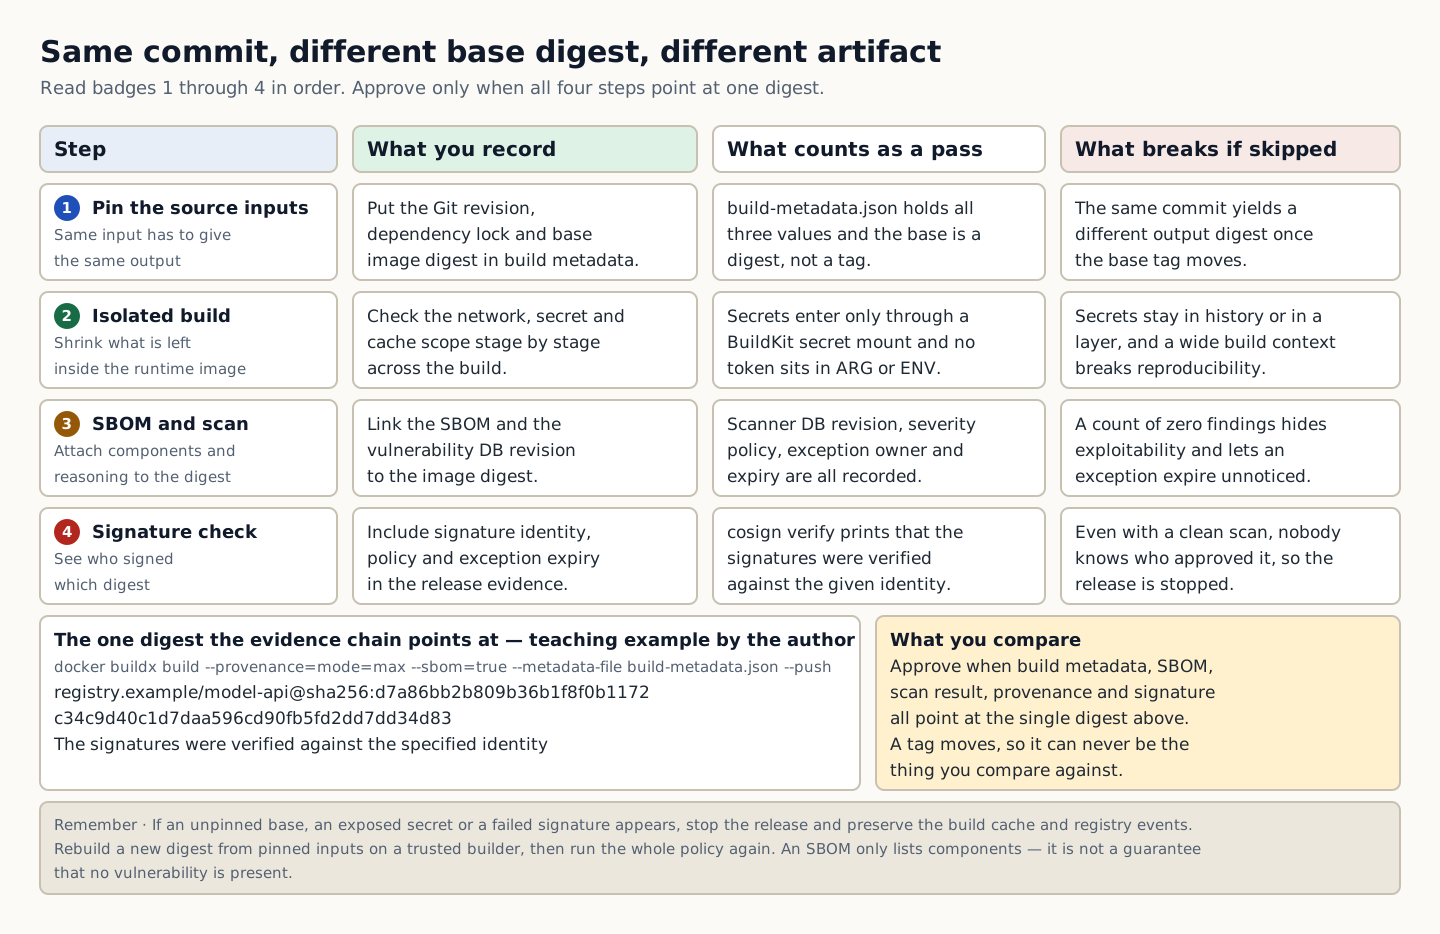
A reproducible build records the source revision, dependency lock, base image digest, builder, and build arguments so that the same inputs produce a reviewable output. The SBOM, scan, provenance, and signature must be linked to the output digest.

Dockerfile layer cache speeds builds up, but a mutable package index, leaked secrets, and a wide build context can harm reproducibility and security. Use multi-stage builds, pinned digests, and cache/secret mounts to reduce what ends up in the runtime image.

Do not make zero scan findings the only goal. Record the scanner database revision, the severity policy, exploitability, and the exception owner and expiry as well.

In the training example the build used the same Git commit, but the base tag changed and the output digest differed. You cannot approve two artifacts as identical merely because the source revision matches. Track the cause of the change by bundling the base digest, the dependency lock and the builder information. Signature verification is a procedure for confirming who signed which digest, and it is performed separately from vulnerability review.

A build supply chain checklist. It shows four steps (pinning the source inputs, isolated build, SBOM and scan, and signature verification) with their pass criteria, and shows that approval requires the build metadata, SBOM, provenance, and signature to all point at the same image digest.
How to read the figure Trace from the source revision to the signed image digest. Read the table from badge 1 to badge 4 top to bottom, and each row across as what you record, what counts as a pass, and what breaks if skipped. Row 1 puts the Git revision, dependency lock and base image digest into build metadata and checks that the base is a digest rather than a tag. Row 2 checks that secrets enter only through a BuildKit secret mount and that no token sits in ARG or ENV. Row 3 links the SBOM and the vulnerability DB revision to the image digest and records severity policy, exception owner and expiry. Row 4 uses cosign verify to confirm who signed which digest. The lower left box gathers the build command, the digest it produced and the signature verification line in one place, and the box on the right is the criterion that approval happens only when build metadata, SBOM, scan result, provenance and signature all point at that one digest. The bottom band carries the rule that the release is stopped whenever an unpinned base, an exposed secret or a failed signature appears; colors only separate the columns, so the figure can be read without distinguishing them. The digests and strings in the table and boxes are teaching examples composed by the author, not values measured on real equipment. Source: composed by the author based on Docker Build documentation · OCI Image Format Specification · Sigstore Cosign Verification.
Why does this happen?
The Dockerfile layer cache speeds up builds, but a mutable package index, leaked secrets, and a broad build context can harm reproducibility and security. Use multi-stage builds, pinned digests, and cache/secret mounts to reduce what ends up in the runtime image.
When is it a problem?
If you see an unpinned base, secret exposure, or a signature failure, there are insufficient grounds to proceed.
Common beginner misconceptions
Passing a secret through ARG or ENV can leave it in the history or in a layer. Use a BuildKit secret mount and a credential with minimal scope.
How to verify it yourself
Put the Git revision, the lockfile, and the base image digest into the build metadata. Check the scope of network, secret, and cache usage per build stage.
To summarize this sectionYou succeed when you submit an unbroken evidence chain from the source revision to the image digest, SBOM, scan, provenance, and signature.

CHAPTER 1 / 5

Start the check at the source input

Do not guess the cause and start by changing settings. If you group the following evidence into records from the same time window, another operator can reproduce the boundary at which the expected state broke.

1. Put the Git revision, lockfile, and base image digest into the build metadata. 2. Check the scope of network, secret, and cache usage for each build stage. 3. Link the SBOM and the vulnerability DB revision to the image digest. 4. Include the signature identity, the policy, and the exception expiry in the release evidence.

CHAPTER 2 / 5

Pins the lab target for the isolated build

Commands for reproducing the isolated environment · do not run them in the browser
docker buildx build --provenance=mode=max --sbom=true --metadata-file build-metadata.json --push -t registry.example/model-api:review .
docker buildx imagetools inspect registry.example/model-api:review
cosign verify --key cosign.pub registry.example/model-api@sha256:d7a86bb2b809b36b1f8f0b1172c34c9d40c1d7daa596cd90fb5fd2dd7dd34d83

CHAPTER 3 / 5

Distinguish the output of the artifact evidence from what it means

Expected output for training · not an actual measurement
registry.example/model-api@sha256:d7a86bb2b809b36b1f8f0b1172c34c9d40c1d7daa596cd90fb5fd2dd7dd34d83
Verification for registry.example/model-api@sha256:d7a86bb2b809b36b1f8f0b1172c34c9d40c1d7daa596cd90fb5fd2dd7dd34d83 --
The signatures were verified against the specified identity

CHAPTER 4 / 5

Decide whether to proceed or stop at signature approval

CHAPTER 5 / 5

Re-verify recovery of build and the software supply chain

CONCRETE CASES

Fix a Dockerfile that has a mutable base tag and a token left inside the image, and produce a list of evidence that can be approved.

Do not make zero scan findings the only goal. Record the scanner database revision, the severity policy, exploitability, and the exception owner and expiry as well.

Wrong responses and boundaries to check

Passing a secret through ARG or ENV can leave it in the history or in a layer. Use BuildKit secret mounts and minimally scoped credentials.

If the digest or the signature differs, stop the release and preserve the build cache and the registry events. Produce a new digest from pinned inputs on a trusted builder and re-run the full policy. After recovery, measure again with the same commands and the same success criteria. Do not close an incident just because things appear normal.

INTERACTIVE LAB 1 / 2

Lab 1 · Find the basis for a verdict in the output

Enter values in the browser and check the execution results and the failure and recovery paths. No commands are ever sent to real equipment or the NAS.

Lab scenario:: Fix a Dockerfile with a mutable base tag and a token left inside the image, then build an approvable evidence list. Instructions:: In the browser, read the training output below and write a verdict. Do not send the commands to real equipment. To reproduce the commands separately, prepare an approved isolated environment with the relevant tools and example files. Save the entire output, and if you see an unpinned base, secret exposure, or a signature failure, do not move on to the next change.

registry.example/model-api@sha256:d7a86bb2b809b36b1f8f0b1172c34c9d40c1d7daa596cd90fb5fd2dd7dd34d83
Verification for registry.example/model-api@sha256:d7a86bb2b809b36b1f8f0b1172c34c9d40c1d7daa596cd90fb5fd2dd7dd34d83 --
The signatures were verified against the specified identity

The point is not to memorize the values themselves but to confirm that the build metadata, SBOM, and signature all point to the same immutable digest. The values shown are reproduced examples for training, not measurements taken on real equipment. Identifiers and values can differ by device, driver, and cluster.

INTERACTIVE LAB 2 / 2

Lab 2 · Plan for stopping and recovery

Enter values in the browser and check the execution results and the failure and recovery paths. No commands are ever sent to real equipment or the NAS.

Passing a secret through ARG or ENV can leave it in the history or in a layer. Use BuildKit secret mounts and minimally scoped credentials.

KEY TERMS

Key terms in this unit

SBOM (Software Bill of Materials)
It describes the components included in an artifact; on its own, it guarantees neither the absence of vulnerabilities nor trustworthiness.

UNIT WORKBOOK

Exercises and worksheets for applying concepts to new situations

Start by checking basic principles, then expand to practical workplace decisions. After submitting an answer, you can see why every option is correct or incorrect, not just the correct answer.

Document the stop conditions and recovery evidence for build and the software supply chain in a work record.

PERSONAL WORKSHEET

A learning worksheet you adapt to your own environment

Your input remains only on the current browser screen and is not stored or transmitted externally. Use categories and pseudonyms instead of actual sensitive information.

OFFICIAL SOURCES

Verify against official sources

Reviewed against official documentation and training output. Commands and performance tests on real hardware are unconfirmed.

CORE UNIT 3 / 3

Registry operations and air-gapped import

Verify TLS, authentication, retention, backup, and the air-gap chain of custody.

Difficulty
Intermediate
Structure
Lessons 5 · Labs 2 · Assessment

Diagrams and tables: composed by the author using each lesson's official primary sources. Find the originals and review dates at the end of that lesson.

PREREQUISITE CHECK

Three things to check before reading

This is not a test of memorized answers. Think about each question first, then open the explanation to review the foundational concepts used in this course.

1Does this unit send commands to real equipment?

No. Read the training output in the browser and make the judgment there. Any separate reproduction is done only in an approved isolated environment.

2What permissions and environment must you confirm before the lab?

Rootless first, registry project administrator. TLS registry and isolated air-gap staging.

3What evidence did you record in the previous unit, "Build and the software supply chain"?

Success means submitting an unbroken evidence chain from the source revision through the image digest, SBOM, scan, provenance, and signature.

TEXTBOOK GUIDE

Main text that covers each concept from its background to the criteria for judging it

We explain the material section by section so readers new to IT can connect causes and effects without memorizing terms.

  1. Explain the components and failure boundaries of Registry operations and air-gapped import with a diagram.
  2. Judge the state of Registry operations and air-gapped import from command output and observed values.
  3. Write the stop conditions and recovery evidence for Registry operations and air-gapped import into a work record.
Registry operations and air-gapped import Lab environment and safety boundaries
Hardwarecontainer host·private registry fixture
SoftwareUbuntu 24.04·containerd 1.7·Docker/BuildKit·cosign
Required permissionsRootless first, registry project administrator
NetworkingTLS registry and isolated air-gap staging

Reviewed against official documentation and training output. Commands and performance tests on real hardware are unconfirmed.

Applies to version: OCI Image Specification 1.1.x · containerd 1.7.x fixture · Manuscript review date: 2026-09-01

CONCEPT FLOW

How the chapters connect

The chapters are not isolated short answers to memorize. Follow them from left to right to see how each chapter's concepts support the next decision.

  1. 1.Start the checks at the external registry
  2. 2.Fix the lab target for imported media
  3. 3.Distinguish the output of the internal registry from its meaning
  4. 4.Make the go/stop decision on the operational policy
  5. 5.Re-verify recovery of Registry operations and air-gapped import
Registry operations and air-gapped import: the overall map. If you lose track while reading the detailed explanations and chapters below, return to this sequence.

CONTROLLED EXPLANATION

Follow the evidence to check, one step at a time

Current explanation · 1/5 · Start the checks at the external registry

Up next: Fix the lab target for imported media

  1. Start the checks at the external registry

    Do not guess the cause and start by changing settings. If you group the following evidence into records from the same time window, another operator can reproduce the boundary at which the expected state broke.

  2. Fix the lab target for imported media

    Lab scenario:: Write a chain-of-custody worksheet and the No-Go conditions for moving an image with two architectures into an air-gapped network. Instructions:: In the browser, read the training output below and write a verdict. Do not send the commands to real equipment. To reproduce the commands separately, prepare an approved isolated environment with the relevant tools and example files. Save the entire output, and if the media hash, the internal digest, and the approval sheet disagree, do not move on to the next change.

  3. Distinguish the output of the internal registry from its meaning

    The point is not to memorize the values themselves but to confirm that the approved artifact, the imported media, and the internal manifest keep the same content chain. The values shown are reproduced examples for training, not measurements taken on real equipment. Identifiers and values can differ by device, driver, and cluster.

  4. Make the go/stop decision on the operational policy

    You succeed when you combine the external, media, and internal digests, the signature result, the owner and timestamp, and the internal pull test into a single import record. Record the execution time, target identity, commands used, key output, verdict, and next action together in the result.

  5. Re-verify recovery of Registry operations and air-gapped import

    If the hash differs, stop internal pushes and use of the media and isolate it. Build a new archive from a trusted source and restart custody from the beginning. After recovery, measure again with the same commands and the same success criteria. Do not close an incident just because things appear normal.

Conceptual explanation 01

Verify artifact identity and custody at every air-gapped boundary

Chain of custody: a procedure that records the owner, time, integrity, and approval each time an artifact crosses a boundary.

A registry is not a list of tags; it is a service that runs a content-addressed graph of manifests and blobs along with authentication, authorization, TLS, retention, garbage collection, and backup. An air-gapped import must prove custody and hashes at every physical and logical boundary.

A manifest references several blobs, so backing up the database and the filesystem separately at arbitrary times can break consistency. Retention and garbage collection must account for the digests currently deployed and the rollback window.

Check that a signature verified externally still points to the same digest after the internal copy. Internal tags may be rewritten, but the approved identity is kept by digest.

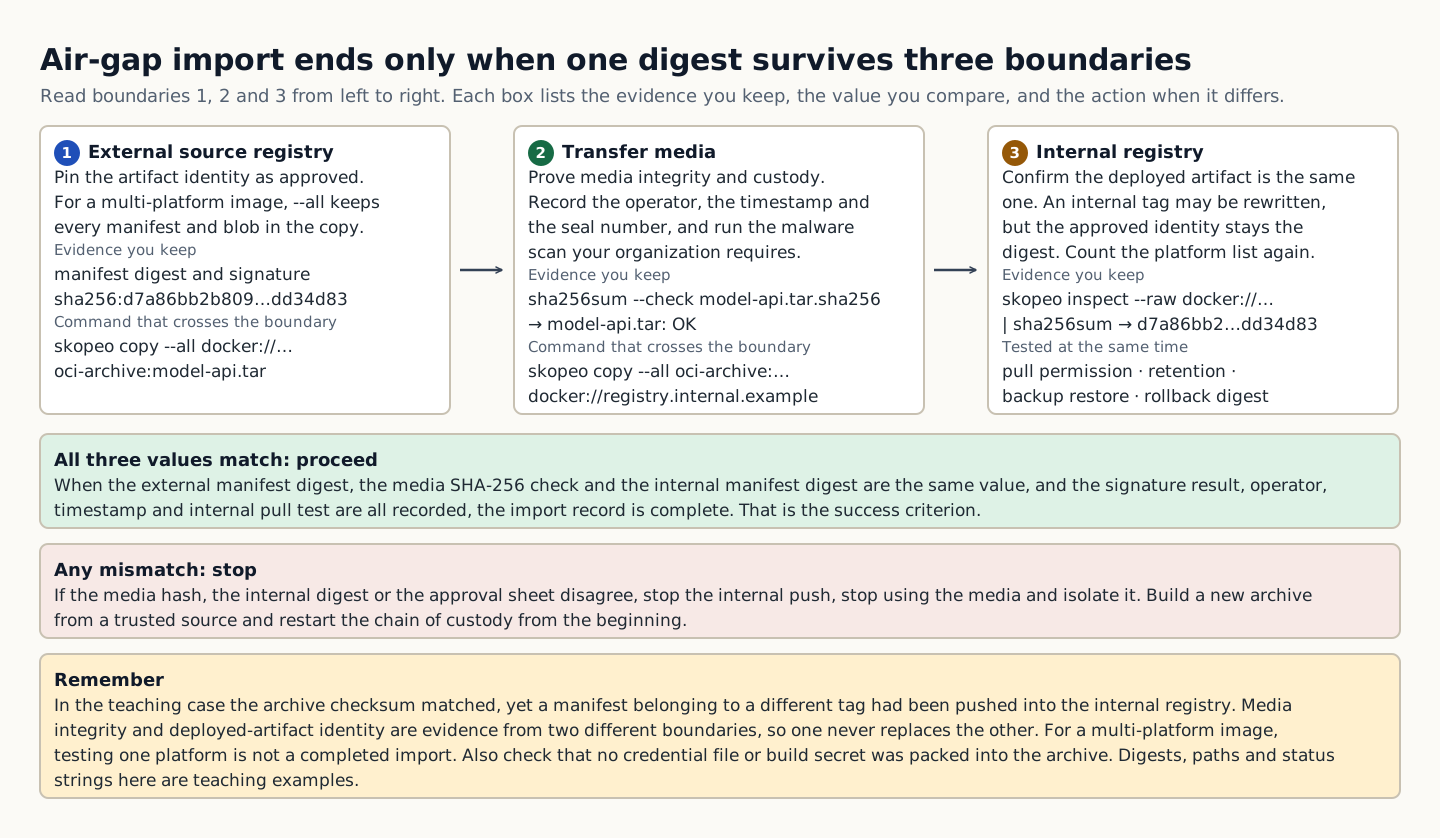
In the training example the archive checksum was correct but a manifest with a different tag ended up in the internal registry. Media integrity and distribution artifact identity are evidence at different boundaries. After verifying the imported archive, the internal manifest digest must also be compared with the externally approved value. A multi-platform image must include every manifest and blob; do not test only one platform and record the import as complete.

A decision flow that compares the same manifest digest across three boundaries (external registry, transfer media, and internal registry) and stops the import on any mismatch
How to read the figure Move from left to right through boundaries 1 · 2 · 3 and confirm that the same digest is preserved. The upper part of each box is the work done at that boundary, and the lower part is the evidence to keep and the command that hands off to the next boundary. When all three values match and the signature result, operator, timestamp, and internal pull test are recorded, the success criteria in the green box are met. If any of the media hash, internal digest, or approval sheet does not match, follow the red box: stop the internal push and media use, and restart the chain of custody from the beginning. The last box summarizes the case showing that a manifest with a different tag can end up in the internal registry even when the archive checksum matches, along with cautions for multi-platform images. The arrows indicate the order of boundaries the artifact passes through, not time proportions. The digests, paths, and status strings in the figure are training examples composed by the author. Source: composed by the author based on OCI Distribution Specification · OCI Image Format Specification · Skopeo Documentation.
Why does this happen?
A manifest references several blobs, so backing up the DB and the filesystem separately at arbitrary times can break consistency. Retention and garbage collection must take the digests currently deployed and the rollback window into account.
When is it a problem?
If you see a mismatch among the media hash, the internal digest, and the approval sheet, there are insufficient grounds to proceed.
Common beginner misconceptions
Check that no credential file or build secret got mixed into the archive. Removable media must follow the organization's malware scan and custody procedures.
How to verify it yourself
Store the manifest digest and the signature from the external source registry. Record the SHA-256 of the export archive and the media, the owner, the timestamp, and the seal number.
To summarize this sectionYou succeed when you combine the external, media, and internal digests, the signature result, the owner and timestamp, and the internal pull test into a single import record.

CHAPTER 1 / 5

Start the checks at the external registry

Do not guess the cause and start by changing settings. If you group the following evidence into records from the same time window, another operator can reproduce the boundary at which the expected state broke.

1. Store the manifest digest and signature of the external source registry. 2. Record the SHA-256 of the export archive and the media, the responsible person, the time, and the seal number. 3. After the internal push, compare the manifest digest and the platform list again. 4. Test pull permissions, retention, backup restore, and the rollback digest.

CHAPTER 2 / 5

Fix the lab target for imported media

Commands for reproducing the isolated environment · do not run them in the browser
skopeo copy --all docker://registry.external.example/model-api@sha256:d7a86bb2b809b36b1f8f0b1172c34c9d40c1d7daa596cd90fb5fd2dd7dd34d83 oci-archive:model-api.tar
sha256sum model-api.tar > model-api.tar.sha256
sha256sum --check model-api.tar.sha256
skopeo copy --all oci-archive:model-api.tar docker://registry.internal.example/model-api:review
skopeo inspect --raw docker://registry.internal.example/model-api@sha256:d7a86bb2b809b36b1f8f0b1172c34c9d40c1d7daa596cd90fb5fd2dd7dd34d83 | sha256sum

CHAPTER 3 / 5

Distinguish the output of the internal registry from its meaning

Expected output for training · not an actual measurement
model-api.tar: OK
d7a86bb2b809b36b1f8f0b1172c34c9d40c1d7daa596cd90fb5fd2dd7dd34d83  -

CHAPTER 4 / 5

Make the go/stop decision on the operational policy

CHAPTER 5 / 5

Re-verify recovery of Registry operations and air-gapped import

CONCRETE CASES

Write a chain-of-custody worksheet and the No-Go conditions for moving an image with two architectures into an air-gapped network.

Check that a signature verified externally still points to the same digest after the internal copy. Internal tags may be rewritten, but the approved identity is kept by digest.

Wrong responses and boundaries to check

Check that no credential files or build secrets have been mixed into the archive. Removable media must go through the organization's malware scan and custody procedures.

If the hash differs, stop internal pushes and use of the media and isolate it. Build a new archive from a trusted source and restart custody from the beginning. After recovery, measure again with the same commands and the same success criteria. Do not close an incident just because things appear normal.

INTERACTIVE LAB 1 / 2

Lab 1 · Find the basis for a verdict in the output

Enter values in the browser and check the execution results and the failure and recovery paths. No commands are ever sent to real equipment or the NAS.

Lab scenario:: Write a chain-of-custody worksheet and the No-Go conditions for moving an image with two architectures into an air-gapped network. Instructions:: In the browser, read the training output below and write a verdict. Do not send the commands to real equipment. To reproduce the commands separately, prepare an approved isolated environment with the relevant tools and example files. Save the entire output, and if the media hash, the internal digest, and the approval sheet disagree, do not move on to the next change.

model-api.tar: OK
d7a86bb2b809b36b1f8f0b1172c34c9d40c1d7daa596cd90fb5fd2dd7dd34d83  -

The point is not to memorize the values themselves but to confirm that the approved artifact, the imported media, and the internal manifest keep the same content chain. The values shown are reproduced examples for training, not measurements taken on real equipment. Identifiers and values can differ by device, driver, and cluster.

INTERACTIVE LAB 2 / 2

Lab 2 · Plan for stopping and recovery

Enter values in the browser and check the execution results and the failure and recovery paths. No commands are ever sent to real equipment or the NAS.

Check that no credential files or build secrets have been mixed into the archive. Removable media must go through the organization's malware scan and custody procedures.

KEY TERMS

Key terms in this unit

Chain of custody
A procedure that records the owner, time, integrity, and approval each time an artifact crosses a boundary.

UNIT WORKBOOK

Exercises and worksheets for applying concepts to new situations

Start by checking basic principles, then expand to practical workplace decisions. After submitting an answer, you can see why every option is correct or incorrect, not just the correct answer.

Write the stop conditions and recovery evidence for Registry operations and air-gapped import into a work record.

PERSONAL WORKSHEET

A learning worksheet you adapt to your own environment

Your input remains only on the current browser screen and is not stored or transmitted externally. Use categories and pseudonyms instead of actual sensitive information.

OFFICIAL SOURCES

Verify against official sources

Reviewed against official documentation and training output. Commands and performance tests on real hardware are unconfirmed.

DECISION ACTIVITY

After the deployment was approved, the digest of the `model-api:prod` tag changed. What do you do?

First write down the evidence you need and the stop criteria, then choose a verdict.

Choose an answer

THREE-LEVEL ASSESSMENT

From basic principles to operational decisions

When you submit an answer you can see why every option is right or wrong.

Basic Question 1

What primarily fixes the content identity of an OCI image?

Choose an answer
Apply Question 2

What must the SBOM and the signature be tied to?

Choose an answer
Capstone Question 3

What is the correct evidence flow for an air-gapped import?

Choose an answer

LEARNING RECORD

Have you reviewed the text, decision activities, and all explanations?

Completion status is stored only in this browser.