KoreaDevKNOWLEDGE SHARING

Content typeLearn

AI INFRASTRUCTURE · 04 / 12

GPU hardware and host preparation

Inspect GPU servers on delivery, verify the firmware, driver, and CUDA relationships, then build a safe baseline and a rollback procedure.

Difficulty
Intermediate
Structure
Core units 3 · Judgment activities · Three-stage assessment

NEW HIRE ONBOARDING

Start in the order you would receive your first assignment

So that even a new hire with no prior IT background can follow along, we start with the situation, the task, the evidence, and when to report, before difficult definitions.

  1. 01

    Read the situation in one sentence

    Check the physical inventory, PCIe topology, driver/runtime compatibility, DCGM health, the product-specific Field Diagnostic and a representative workload step by step, and record the rollback and RMA boundaries.

  2. 02

    Today's assignment

    Document the stop conditions and recovery evidence for isolation, return to service, retesting, and the RMA evidence package in a work record.

  3. 03

    Evidence that shows the work is complete

    Reviewed against official documentation and training output. Commands and performance tests on real hardware are unconfirmed.

  4. 04

    When to stop and ask a senior colleague

    After a driver update, 1 of 8 GPUs has disappeared from nvidia-smi. What is the first response?

Unpack unfamiliar terms first

NUMA (Non-Uniform Memory Access)
An architecture in which path cost depends on which memory and PCIe devices a CPU accesses.

Operational question for this course

How do you turn the fact that the GPU is visible into evidence of production readiness?

Check the physical inventory, PCIe topology, driver/runtime compatibility, DCGM health, the product-specific Field Diagnostic and a representative workload step by step, and record the rollback and RMA boundaries.

CORE UNIT 1 / 3

GPU server hardware and acceptance

Tie the GPU, PCIe, NUMA, power, and cooling state to the incoming inspection evidence.

Difficulty
Intermediate
Structure
Lessons 5 · Labs 2 · Assessment

Diagrams and tables: composed by the author using each lesson's official primary sources. Find the originals and review dates at the end of that lesson.

PREREQUISITE CHECK

Three things to check before reading

This is not a test of memorized answers. Think about each question first, then open the explanation to review the foundational concepts used in this course.

1Does this unit send commands to real equipment?

No. Read the training output in the browser and make the judgment there. Any separate reproduction is done only in an approved isolated environment.

2What permissions and environment must you confirm before the lab?

sudo diagnostics and changes require an approved maintenance window and a rollback plan. An NVIDIA repository mirror or an approved air-gapped bundle.

3How do you record a value you have never seen before and a test you have not yet run?

Record it as unconfirmed. Distinguish expected training output from actual measurements, and do not fill in blanks with unapproved work.

TEXTBOOK GUIDE

Main text that covers each concept from its background to the criteria for judging it

We explain the material section by section so readers new to IT can connect causes and effects without memorizing terms.

  1. Explain the components and failure boundaries of GPU server hardware and acceptance with a diagram.
  2. Judge the state of GPU server hardware and acceptance from command output and observed values.
  3. Write the stop conditions and recovery evidence for GPU server hardware and acceptance into a work record.
GPU server hardware and acceptance Lab environment and safety boundaries
HardwareNVIDIA GPU host inventory fixture
SoftwareUbuntu 24.04·NVIDIA driver·CUDA·DCGM
Required permissionssudo diagnostics and changes require an approved maintenance window and a rollback plan
NetworkingAn NVIDIA repository mirror or an approved air-gapped bundle

Reviewed against official documentation and training output. Commands and performance tests on real hardware are unconfirmed.

Applies to version: Ubuntu Server 24.04 LTS · NVIDIA DCGM 4.x documentation · Manuscript review date: 2026-09-01

CONCEPT FLOW

How the chapters connect

The chapters are not isolated short answers to memorize. Follow them from left to right to see how each chapter's concepts support the next decision.

  1. 1.Start the checks at asset acceptance
  2. 2.Pins down the lab target for the PCIe path
  3. 3.Distinguishes GPU topology output from its meaning
  4. 4.Decides whether the health criteria proceed or stop
  5. 5.Re-verify recovery of GPU server hardware and acceptance
GPU server hardware and acceptance: the overall map. If you lose track while reading the detailed explanations and chapters below, return to this sequence.

CONTROLLED EXPLANATION

Follow the evidence to check, one step at a time

Current explanation · 1/5 · Start the checks at asset acceptance

Up next: Pins down the lab target for the PCIe path

  1. Start the checks at asset acceptance

    Do not guess the cause and start by changing settings. If you group the following evidence into records from the same time window, another operator can reproduce the boundary at which the expected state broke.

  2. Pins down the lab target for the PCIe path

    Lab scenario:: In the 8-GPU host fixture, find the PCIe width downgrade on one GPU and the NIC locality problem, and write the rationale for No-Go. Instructions:: In the browser, read the training output below and write a verdict. Do not send the commands to real equipment. To reproduce the commands separately, prepare an approved isolated environment with the relevant tools and example files. Save the entire output, and if you see a missing GPU, a PCIe downgrade, or an Xid event, do not move on to the next change.

  3. Distinguishes GPU topology output from its meaning

    The point is not to memorize the values themselves but to confirm that every GPU identity and the actual PCIe/NUMA path negotiated to the designed values. The values shown are reproduced examples for training, not measurements taken on real equipment. Identifiers and values can differ by device, driver, and cluster.

  4. Decides whether the health criteria proceed or stop

    Success means submitting a table of each GPU's UUID, PCI address, NUMA node, distance to the NIC, link state, and any anomalies. Record the execution time, target identity, commands used, key output, verdict, and next action together in the result.

  5. Re-verify recovery of GPU server hardware and acceptance

    If anything is missing or downgraded, block workload placement and preserve the kernel and BMC logs. Change only one part or one slot during approved maintenance, then re-collect the full topology. After recovery, measure again with the same commands and the same success criteria. Do not close an incident just because things appear normal.

Conceptual explanation 01

Accept GPU assets down to the PCIe and NUMA topology

NUMA (Non-Uniform Memory Access): an architecture in which path cost depends on which memory and PCIe devices a CPU accesses.

Matching only the GPU count is not enough. The GPU UUIDs and serials, PCIe generation/width, NUMA locality, NVLink/NVSwitch, PSU, and cooling state must all match the design topology.

A path that crosses a CPU socket and a PCIe switch affects GPU-to-NIC and GPU-to-storage traffic. If a link negotiates to a lower generation or width, functionality may still work while performance can drop sharply.

Receiving evidence must link beyond the carton serial to the identity read by the firmware and the OS. Compare the inventory and corrected error deltas before and after burn-in to find early-life defects.

In the training example the GPU and NIC are attached to CPU socket 0 while the data processing thread runs on socket 1. The fact that every device is visible does not let you say the data path is short. Record the GPU, NIC and CPU affinity and the PCIe link width first, then compare a representative load in the same placement. Move a card between slots only through a maintenance procedure that has confirmed the supported cabling and power configuration.
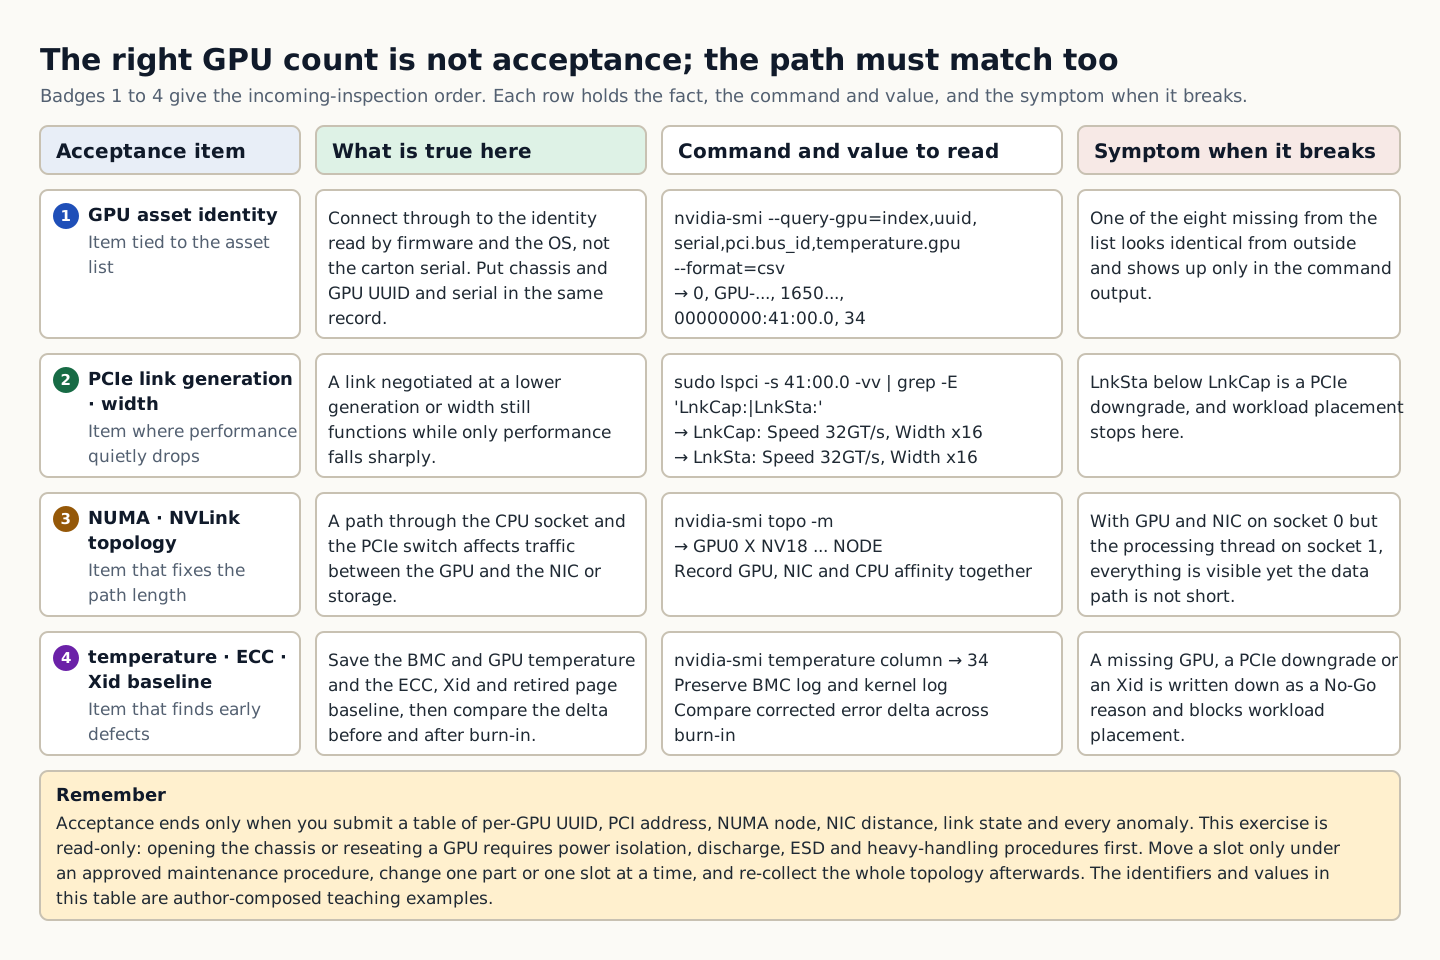
A four-column table giving, for each of four items (GPU asset identity; PCIe link generation and width; NUMA and NVLink topology; and the temperature, ECC, and Xid baseline), what is true there, the command to check it, and the symptom when it does not match
How to read the figure Badges 1 to 4 in the leftmost column give the order of the receiving inspection, and each row places side by side what is true for that item, the check command and observed value, and the symptom of a mismatch. In row 1, `nvidia-smi --query-gpu` outputs index, uuid, serial, pci.bus_id, and temperature on one line, linking the identity read by the OS, not the carton serial, to the asset list; if one of the eight GPUs is missing, the system looks the same from outside, and only this output reveals it. In row 2, both `LnkCap` and `LnkSta` must show `Speed 32GT/s, Width x16` to pass; if LnkSta is lower, the PCIe link has downgraded, so stop workload placement here. In row 3, `nvidia-smi topo -m` shows GPU, NIC, and CPU affinity; if the GPU and NIC are on socket 0 but the processing thread runs on socket 1, the data path is not short even though everything is visible. Row 4 is where early defects are found: save the BMC and GPU temperatures and the ECC, Xid, and retired page baselines, and compare the deltas before and after burn-in. If any of a missing GPU, a PCIe downgrade, or an Xid appears, record it as a No-Go reason; as the summary box at the bottom states, this lab is read-only, so do not open the chassis or reseat GPUs. The figure can be read from badge numbers and column titles alone without distinguishing colors, and the identifiers and numbers in the table are training examples composed by the author. It does not include baseboard photos or NVLink cabling diagrams, only the check order and decision criteria. Source: composed by the author based on Linux PCI Support Library · NVIDIA DCGM User Guide.
Why does this happen?
A path that crosses the CPU socket and a PCIe switch affects GPU-to-NIC and GPU-to-storage traffic. If a link negotiates at a lower generation or width, functionality may still work while performance can drop sharply.
When is it a problem?
If you see a missing GPU, a PCIe downgrade, or an Xid event, there are insufficient grounds to proceed.
Common beginner misconceptions
Before opening a chassis or reseating a GPU, you need procedures for power isolation, discharge, ESD, and heavy lifting. This lab is read-only.
How to verify it yourself
Link the chassis and GPU UUIDs and serials to the asset list. Compare the current and maximum speed and width in lspci.
To summarize this sectionYou succeed when you submit a table of the UUID, PCI address, NUMA node, NIC distance, and link state per GPU, along with the anomalous entries.

CHAPTER 1 / 5

Start the checks at asset acceptance

Do not guess the cause and start by changing settings. If you group the following evidence into records from the same time window, another operator can reproduce the boundary at which the expected state broke.

1. Link the chassis, GPU UUIDs, and serials to the asset list. 2. Compare the current and max speed and width reported by lspci. 3. Check GPU, NIC, and CPU affinity with nvidia-smi topo. 4. Store the BMC and GPU temperatures and the ECC, Xid, and retired-page baselines.

CHAPTER 2 / 5

Pins down the lab target for the PCIe path

Commands for reproducing the isolated environment · do not run them in the browser
nvidia-smi --query-gpu=index,uuid,serial,pci.bus_id,temperature.gpu --format=csv
nvidia-smi topo -m
sudo lspci -s 41:00.0 -vv | grep -E 'LnkCap:|LnkSta:'

CHAPTER 3 / 5

Distinguishes GPU topology output from its meaning

Expected output for training · not an actual measurement
0, GPU-..., 1650..., 00000000:41:00.0, 34
GPU0  X  NV18 ... NODE
LnkCap: Speed 32GT/s, Width x16
LnkSta: Speed 32GT/s, Width x16

CHAPTER 4 / 5

Decides whether the health criteria proceed or stop

CHAPTER 5 / 5

Re-verify recovery of GPU server hardware and acceptance

CONCRETE CASES

In the 8-GPU host fixture, find the PCIe width downgrade on one GPU and the NIC locality problem, and write the No-Go rationale.

Receiving evidence must link beyond the carton serial to the identity read by the firmware and the OS. Compare the inventory and corrected error deltas before and after burn-in to find early-life defects.

Wrong responses and boundaries to check

Before opening a chassis or reseating a GPU, you need procedures for power isolation, discharge, ESD, and heavy lifting. This lab is read-only.

If anything is missing or downgraded, block workload placement and preserve the kernel and BMC logs. Change only one part or one slot during approved maintenance, then re-collect the full topology. After recovery, measure again with the same commands and the same success criteria. Do not close an incident just because things appear normal.

INTERACTIVE LAB 1 / 2

Lab 1 · Find the basis for a verdict in the output

Enter values in the browser and check the execution results and the failure and recovery paths. No commands are ever sent to real equipment or the NAS.

Lab scenario:: In the 8-GPU host fixture, find the PCIe width downgrade on one GPU and the NIC locality problem, and write the rationale for No-Go. Instructions:: In the browser, read the training output below and write a verdict. Do not send the commands to real equipment. To reproduce the commands separately, prepare an approved isolated environment with the relevant tools and example files. Save the entire output, and if you see a missing GPU, a PCIe downgrade, or an Xid event, do not move on to the next change.

0, GPU-..., 1650..., 00000000:41:00.0, 34
GPU0  X  NV18 ... NODE
LnkCap: Speed 32GT/s, Width x16
LnkSta: Speed 32GT/s, Width x16

The point is not to memorize the values themselves but to confirm that every GPU identity and the actual PCIe/NUMA path negotiated to the designed values. The values shown are reproduced examples for training, not measurements taken on real equipment. Identifiers and values can differ by device, driver, and cluster.

INTERACTIVE LAB 2 / 2

Lab 2 · Plan for stopping and recovery

Enter values in the browser and check the execution results and the failure and recovery paths. No commands are ever sent to real equipment or the NAS.

Before opening a chassis or reseating a GPU, you need procedures for power isolation, discharge, ESD, and heavy lifting. This lab is read-only.

KEY TERMS

Key terms in this unit

NUMA (Non-Uniform Memory Access)
An architecture in which path cost depends on which memory and PCIe devices a CPU accesses.

UNIT WORKBOOK

Exercises and worksheets for applying concepts to new situations

Start by checking basic principles, then expand to practical workplace decisions. After submitting an answer, you can see why every option is correct or incorrect, not just the correct answer.

Write the stop conditions and recovery evidence for GPU server hardware and acceptance into a work record.

PERSONAL WORKSHEET

A learning worksheet you adapt to your own environment

Your input remains only on the current browser screen and is not stored or transmitted externally. Use categories and pseudonyms instead of actual sensitive information.

OFFICIAL SOURCES

Verify against official sources

Reviewed against official documentation and training output. Commands and performance tests on real hardware are unconfirmed.

CORE UNIT 2 / 3

Driver and CUDA software stack

Explain the compatibility boundaries between kernel module, driver, runtime, and container.

Difficulty
Intermediate
Structure
Lessons 5 · Labs 2 · Assessment

Diagrams and tables: composed by the author using each lesson's official primary sources. Find the originals and review dates at the end of that lesson.

PREREQUISITE CHECK

Three things to check before reading

This is not a test of memorized answers. Think about each question first, then open the explanation to review the foundational concepts used in this course.

1Does this unit send commands to real equipment?

No. Read the training output in the browser and make the judgment there. Any separate reproduction is done only in an approved isolated environment.

2What permissions and environment must you confirm before the lab?

sudo diagnostics and changes require an approved maintenance window and a rollback plan. An NVIDIA repository mirror or an approved air-gapped bundle.

3What evidence did you record in the previous unit, "GPU server hardware and acceptance"?

Success means submitting a table of each GPU's UUID, PCI address, NUMA node, distance to the NIC, link state, and any anomalies.

TEXTBOOK GUIDE

Main text that covers each concept from its background to the criteria for judging it

We explain the material section by section so readers new to IT can connect causes and effects without memorizing terms.

  1. Explain the components and failure boundaries of the Driver and CUDA software stack with a diagram.
  2. Judge the state of the Driver and CUDA software stack from command output and observed values.
  3. Write the stop conditions and recovery evidence for the Driver and CUDA software stack into a work record.
Driver and CUDA software stack Lab environment and safety boundaries
HardwareNVIDIA GPU host inventory fixture
SoftwareUbuntu 24.04·NVIDIA driver·CUDA·DCGM
Required permissionssudo diagnostics and changes require an approved maintenance window and a rollback plan
NetworkingAn NVIDIA repository mirror or an approved air-gapped bundle

Reviewed against official documentation and training output. Commands and performance tests on real hardware are unconfirmed.

Applies to version: Ubuntu Server 24.04 LTS · NVIDIA DCGM 4.x documentation · Manuscript review date: 2026-09-01

CONCEPT FLOW

How the chapters connect

The chapters are not isolated short answers to memorize. Follow them from left to right to see how each chapter's concepts support the next decision.

  1. 1.Start the check at the kernel
  2. 2.Pins down the lab target for the GPU driver
  3. 3.Distinguishes the output of the CUDA runtime from its meaning
  4. 4.Make the go/stop decision on the application
  5. 5.Re-verify recovery of the Driver and CUDA software stack
Driver and CUDA software stack: the overall map. If you lose track while reading the detailed explanations and chapters below, return to this sequence.

CONTROLLED EXPLANATION

Follow the evidence to check, one step at a time

Current explanation · 1/5 · Start the check at the kernel

Up next: Pins down the lab target for the GPU driver

  1. Start the check at the kernel

    Do not guess the cause and start by changing settings. If you group the following evidence into records from the same time window, another operator can reproduce the boundary at which the expected state broke.

  2. Pins down the lab target for the GPU driver

    Lab scenario:: Diagnose the boundary in a fixture where the driver is loaded but the container cannot find libcuda. Instructions:: In the browser, read the training output below and write a verdict. Do not send the commands to real equipment. To reproduce the commands separately, prepare an approved isolated environment with the relevant tools and example files. Save the entire output, and if there is a module/library mismatch or an unsupported ABI, do not move on to the next change.

  3. Distinguishes the output of the CUDA runtime from its meaning

    The point is not to memorize the values themselves but to confirm that the kernel module and the user-space library belong to the same driver family and that the application can find the library. The values shown are reproduced examples for training, not measurements taken on real equipment. Identifiers and values can differ by device, driver, and cluster.

  4. Make the go/stop decision on the application

    Success means presenting a version matrix for the kernel, packages, module, NVML, CUDA compatibility, and container libraries, together with the rollback artifact. Record the execution time, target identity, commands used, key output, verdict, and next action together in the result.

  5. Re-verify recovery of the Driver and CUDA software stack

    On a module or library mismatch, stop the rollout instead of overwriting with extra packages. Roll back to the previous kernel and driver combination through the package transaction, then re-verify the reboot, the inventory, and a representative workload. After recovery, measure again with the same commands and the same success criteria. Do not close an incident just because things appear normal.

Conceptual explanation 01

Check GPU software compatibility from the kernel up to the application

Driver and CUDA runtime: the driver controls the device, while the CUDA runtime is the software layer through which applications use GPU features.

The kernel module, the user-space driver library, the CUDA runtime and toolkit, the application binary, and the container libraries are all different layers. Even when nvidia-smi works, the ABI and GPU architecture the application requires may not match.

The NVIDIA driver owns the GPU and provides the user-space libraries. CUDA minor and forward compatibility come with conditions, so the maximum CUDA level the driver reports must not be read as the installed toolkit version.

Before an upgrade, pin the version matrix of the kernel, driver packages, module, libraries, and container runtime, along with the rollback packages. Keep the state before and after the reboot as separate evidence.

In the training example nvidia-smi shows support for the CUDA 12 family but the nvcc command is missing. That indicator is not a direct report of the installed toolkit, so you cannot conclude the installation failed. Compare the runtime and driver compatibility the application requires against the documentation and check which library the actual process uses. Judge separately whether a development compiler is needed and what the inference runtime requires to run.

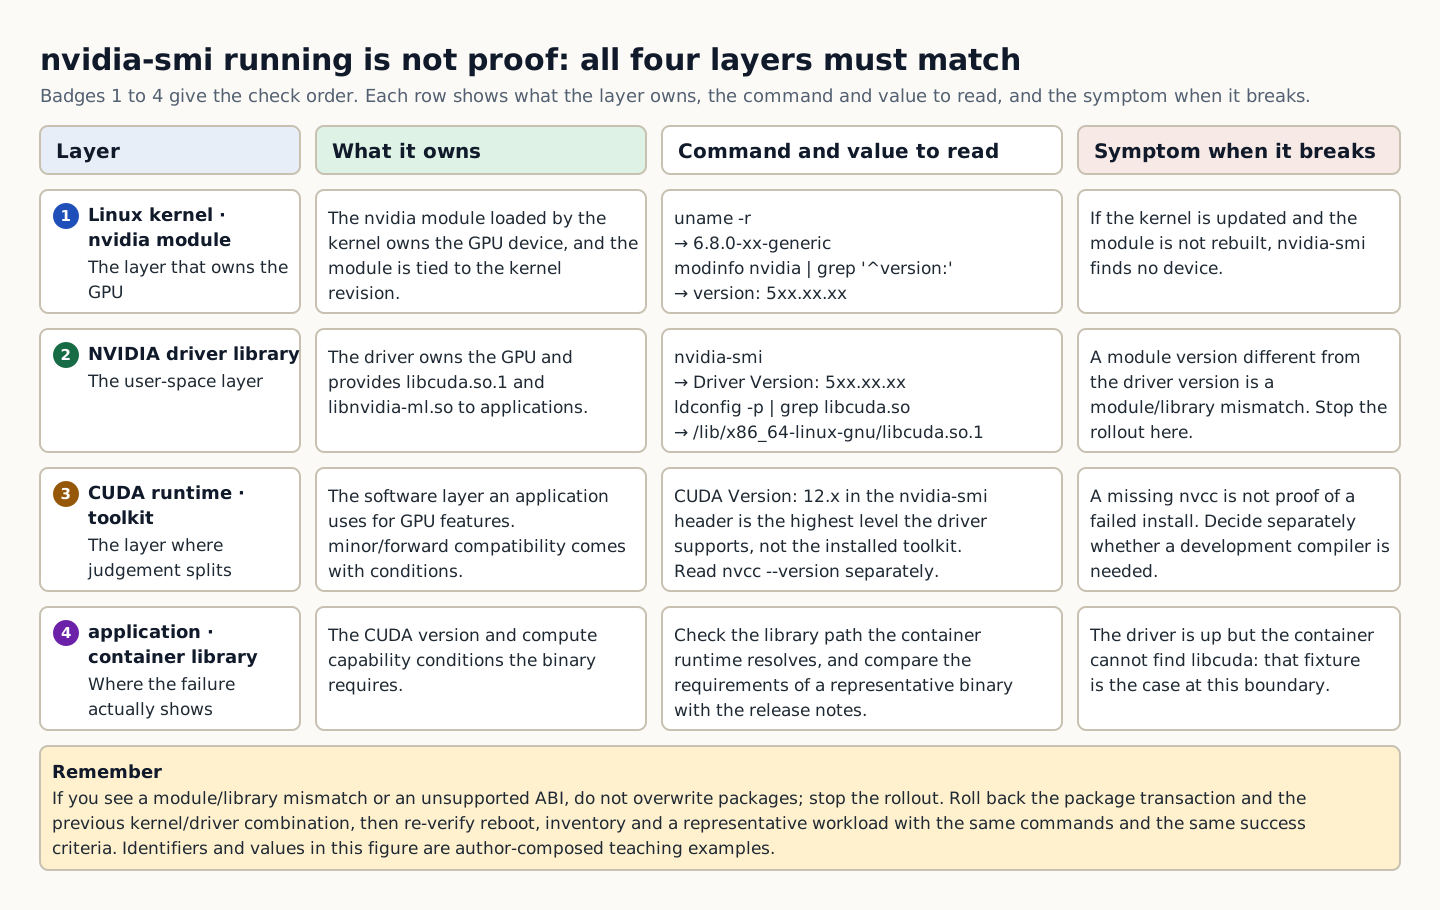
A four-column table giving, for each of four layers (kernel module, driver library, CUDA runtime, and application container library), what it owns, the command to check it, and the symptom when it breaks
How to read the figure Badges 1 to 4 in the leftmost column give the order of checks, and each row places side by side what that layer is responsible for, the command to read and the observed value, and the symptom when the chain breaks. In row 1, `uname -r` shows `6.8.0-xx-generic` and `modinfo nvidia` shows `version: 5xx.xx.xx`, confirming that the kernel and module are a matching combination. In row 2, the `Driver Version` in nvidia-smi must match the module version just read, and `/lib/x86_64-linux-gnu/libcuda.so.1` must appear in `ldconfig -p` for the chain to reach the user-space library. Row 3 is where the judgment diverges: `CUDA Version: 12.x` at the top of nvidia-smi is the maximum level the driver supports, not the installed toolkit, so read `nvcc --version` separately. Row 4 is where failures actually surface; the lab fixture in which the driver is loaded but the container cannot find libcuda belongs here. If a module/library mismatch or an unsupported ABI appears in any row, do not overwrite packages; roll back, as the summary box at the bottom states. The figure can be read from badge numbers and column titles alone without distinguishing colors, and the identifiers and numbers in the table are training examples composed by the author. It does not depict physical wiring between layers or call time proportions, only the check order and decision criteria. Source: composed by the author based on NVIDIA CUDA Compatibility · NVIDIA DCGM User Guide.
Why does this happen?
The NVIDIA driver owns the GPU and provides the user-space libraries. CUDA minor and forward compatibility come with conditions, so the maximum CUDA level the driver reports must not be read as the installed toolkit version.
When is it a problem?
If you see a module/library mismatch or an unsupported ABI, there are insufficient grounds to proceed.
Common beginner misconceptions
The CUDA Version at the top of nvidia-smi is not the installed nvcc version. Check `nvcc --version` and the application dependencies separately.
How to verify it yourself
Record the running kernel and the installed driver package revision. Compare the loaded module version with the nvidia-smi driver version.
To summarize this sectionYou succeed when you present a version matrix of the kernel, package, module, NVML, CUDA compatibility, and container libraries, along with the rollback artifacts.

CHAPTER 1 / 5

Start the check at the kernel

Do not guess the cause and start by changing settings. If you group the following evidence into records from the same time window, another operator can reproduce the boundary at which the expected state broke.

1. Record the running kernel and the installed driver package revision. 2. Compare the loaded module version with the nvidia-smi driver version. 3. Check the library paths referenced by ldconfig and by the container runtime. 4. Match the CUDA and compute capability requirements of the representative binary to the release notes.

CHAPTER 2 / 5

Pins down the lab target for the GPU driver

Commands for reproducing the isolated environment · do not run them in the browser
uname -r
modinfo nvidia | grep '^version:'
nvidia-smi
ldconfig -p | grep -E 'libcuda.so|libnvidia-ml.so'

CHAPTER 3 / 5

Distinguishes the output of the CUDA runtime from its meaning

Expected output for training · not an actual measurement
6.8.0-xx-generic
version: 5xx.xx.xx
NVIDIA-SMI ... Driver Version: 5xx.xx.xx CUDA Version: 12.x
libcuda.so.1 => /lib/x86_64-linux-gnu/libcuda.so.1

CHAPTER 4 / 5

Make the go/stop decision on the application

CHAPTER 5 / 5

Re-verify recovery of the Driver and CUDA software stack

CONCRETE CASES

Diagnose the boundary in a fixture where the driver is up but the container cannot find libcuda.

Before an upgrade, pin the version matrix of the kernel, driver packages, module, libraries, and container runtime, along with the rollback packages. Keep the state before and after the reboot as separate evidence.

Wrong responses and boundaries to check

The CUDA Version at the top of nvidia-smi is not the installed nvcc version. Check `nvcc --version` and the application dependencies separately.

On a module or library mismatch, stop the rollout instead of overwriting with extra packages. Roll back to the previous kernel and driver combination through the package transaction, then re-verify the reboot, the inventory, and a representative workload. After recovery, measure again with the same commands and the same success criteria. Do not close an incident just because things appear normal.

INTERACTIVE LAB 1 / 2

Lab 1 · Find the basis for a verdict in the output

Enter values in the browser and check the execution results and the failure and recovery paths. No commands are ever sent to real equipment or the NAS.

Lab scenario:: Diagnose the boundary in a fixture where the driver is loaded but the container cannot find libcuda. Instructions:: In the browser, read the training output below and write a verdict. Do not send the commands to real equipment. To reproduce the commands separately, prepare an approved isolated environment with the relevant tools and example files. Save the entire output, and if there is a module/library mismatch or an unsupported ABI, do not move on to the next change.

6.8.0-xx-generic
version: 5xx.xx.xx
NVIDIA-SMI ... Driver Version: 5xx.xx.xx CUDA Version: 12.x
libcuda.so.1 => /lib/x86_64-linux-gnu/libcuda.so.1

The point is not to memorize the values themselves but to confirm that the kernel module and the user-space library belong to the same driver family and that the application can find the library. The values shown are reproduced examples for training, not measurements taken on real equipment. Identifiers and values can differ by device, driver, and cluster.

INTERACTIVE LAB 2 / 2

Lab 2 · Plan for stopping and recovery

Enter values in the browser and check the execution results and the failure and recovery paths. No commands are ever sent to real equipment or the NAS.

The CUDA Version at the top of nvidia-smi is not the installed nvcc version. Check nvcc --version and the application dependencies separately.

KEY TERMS

Key terms in this unit

Driver and CUDA runtime
The driver controls the device, while the CUDA runtime is the software layer through which applications use GPU features.

UNIT WORKBOOK

Exercises and worksheets for applying concepts to new situations

Start by checking basic principles, then expand to practical workplace decisions. After submitting an answer, you can see why every option is correct or incorrect, not just the correct answer.

Write the stop conditions and recovery evidence for the Driver and CUDA software stack into a work record.

PERSONAL WORKSHEET

A learning worksheet you adapt to your own environment

Your input remains only on the current browser screen and is not stored or transmitted externally. Use categories and pseudonyms instead of actual sensitive information.

OFFICIAL SOURCES

Verify against official sources

Reviewed against official documentation and training output. Commands and performance tests on real hardware are unconfirmed.

CORE UNIT 3 / 3

GPU host verification and rollback

Accept the host through inventory, health, and communication tests, and roll back on failure.

Difficulty
Intermediate
Structure
Lessons 10 · Labs 2 · Assessment

Diagrams and tables: composed by the author using each lesson's official primary sources. Find the originals and review dates at the end of that lesson.

PREREQUISITE CHECK

Three things to check before reading

This is not a test of memorized answers. Think about each question first, then open the explanation to review the foundational concepts used in this course.

1Does this unit send commands to real equipment?

No. Read the training output in the browser and make the judgment there. Any separate reproduction is done only in an approved isolated environment.

2What permissions and environment must you confirm before the lab?

sudo state changes and GPU occupancy diagnostics require an approved maintenance window plus console access and a rollback. An NVIDIA repository mirror or an approved air-gapped bundle.

3What evidence did you record in the previous unit, "Drivers and the CUDA software stack"?

Success means presenting a version matrix for the kernel, packages, module, NVML, CUDA compatibility, and container libraries, together with the rollback artifact.

TEXTBOOK GUIDE

Main text that covers each concept from its background to the criteria for judging it

We explain the material section by section so readers new to IT can connect causes and effects without memorizing terms.

  1. Explain the role, failure boundaries, and RMA linkage of DCGM-based host acceptance and of the vendor-specific Field Diagnostic.
  2. Decide the next action based on the baseline, diagnostic output, PASS, FAIL, RETEST, and summary.json.
  3. Document the stop conditions and recovery evidence for isolation, return to service, retesting, and the RMA evidence package in a work record.
GPU host verification and rollback Lab environment and safety boundaries
HardwareNVIDIA GPU host inventory fixture
SoftwareUbuntu 24.04, NVIDIA driver, CUDA, DCGM, and the product-specific Field Diagnostic package
Required permissionssudo state changes and GPU occupancy diagnostics require an approved maintenance window plus console access and a rollback
NetworkingAn NVIDIA repository mirror or an approved air-gapped bundle

Reviewed against official documentation and training output. Commands and performance tests on real hardware are unconfirmed.

Applies to version: Ubuntu Server 24.04 LTS · NVIDIA DCGM 4.x documentation · NVIDIA DGX Spark Field Diagnostic documentation Support page updated 2026-08-25 · User Guide version not stated · Manuscript review date: 2026-09-01

CONCEPT FLOW

How the chapters connect

The chapters are not isolated short answers to memorize. Follow them from left to right to see how each chapter's concepts support the next decision.

  1. 1.Start the checks from the baseline
  2. 2.Pins down the lab target for the health test
  3. 3.Distinguish the output of the communication load from what it means
  4. 4.Make the go/stop decision on acceptance and recovery
  5. 5.Re-verify recovery of GPU host verification and rollback
  6. 6.Lock in the product and package approval first
  7. 7.Run it after isolation and preflight have passed
  8. 8.Run the product-specific commands
  9. 9.Read PASS, FAIL, and RETEST together with the evidence
  10. 10.Recover or hand off based on the verdict and evidence
GPU host verification and rollback: the overall map. If you lose track while reading the detailed explanations and chapters below, return to this sequence.

CONTROLLED EXPLANATION

Follow the evidence to check, one step at a time

Current explanation · 1/10 · Start the checks from the baseline

Up next: Pins down the lab target for the health test

  1. Start the checks from the baseline

    Do not guess the cause and start by changing settings. If you group the following evidence into records from the same time window, another operator can reproduce the boundary at which the expected state broke.

  2. Pins down the lab target for the health test

    Lab scenario:: From the provided DCGM diagnostic and NCCL results, classify the failure domain and choose between a rollback and a hardware escalation. Instructions:: In the browser, read the training output below and write a verdict. Do not send the commands to real equipment. To reproduce the commands separately, prepare an approved isolated environment with the relevant tools and example files. Save the entire output, and if you see a diagnostic failure, an Xid event, or rising ECC counts, do not move on to the next change.

  3. Distinguish the output of the communication load from what it means

    The point is not to memorize the values themselves but to confirm that every expected GPU passes the health test at the same revision and that no new fatal error appeared. The values shown are reproduced examples for training, not measurements taken on real equipment. Identifiers and values can differ by device, driver, and cluster.

  4. Make the go/stop decision on acceptance and recovery

    Success means leaving the identity, diagnostic JSON, workload conditions, performance, error delta, and an explicit Go/No-Go in a single evidence directory. Record the execution time, target identity, commands used, key output, verdict, and next action together in the result.

  5. Re-verify recovery of GPU host verification and rollback

    On failure, preserve the run ID directory and remove the node from scheduling. Roll back to the previous driver/image, or send the UUID, Xid, sensor data, and reproduction conditions to the hardware owner, then retest with the same plan. After recovery, measure again with the same commands and the same success criteria. Do not close an incident just because things appear normal.

  6. Lock in the product and package approval first

    Before starting a Field Diagnostic, bind the following evidence to the same run ID. If even one item is unconfirmed, do not guess the command; check with support or the system vendor.

  7. Run it after isolation and preflight have passed

    Lab scenario:: Do not turn the RETEST in the training transcript into a FAIL or guess at the cause; instead write a verdict listing the items to check in the original log, the retest approval order, the conditions that forbid a return to service, and the evidence to hand to support. Instructions:: In the browser, read the commands below and the training transcript, and write a verdict. Do not send commands to real equipment. Any separate reproduction is done only in an isolated environment with the current official documentation for the product, an approved package, a console, a work window, and a rollback path.

  8. Run the product-specific commands

  9. Read PASS, FAIL, and RETEST together with the evidence

    This transcript is a training result fixture normalized for learning the result items in the published documentation; it is not output from real equipment. In this normalized transcript, the prerequisite paths are present, but the tool issued a RETEST banner. Your verdict must therefore state that you do not guess the cause and instead check summary.json and the Test, Virtual ID, and Notes fields in the individual test logs.

  10. Recover or hand off based on the verdict and evidence

    If the run is interrupted, keep the node isolated and collect the logs. The published DGX Spark procedure requires a power cycle after an interruption, so follow that instruction only on that product. Retest after resolving the RETEST cause or receiving instructions from support. When finished, restore the service and Secure Boot settings in the product-specific order, then recheck DCGM, a representative workload, and the error delta, and open scheduling last. After recovery, recheck DCGM, the representative workload, and error counters against the same identity and baseline. Do not approve a return to service or an RMA based on a single line of Field Diagnostic output.

Conceptual explanation 01

Accept a GPU host using the baseline and the post-load error delta

Baseline: evidence that records the target, version, conditions, and state together so that the system can be compared before and after a change.

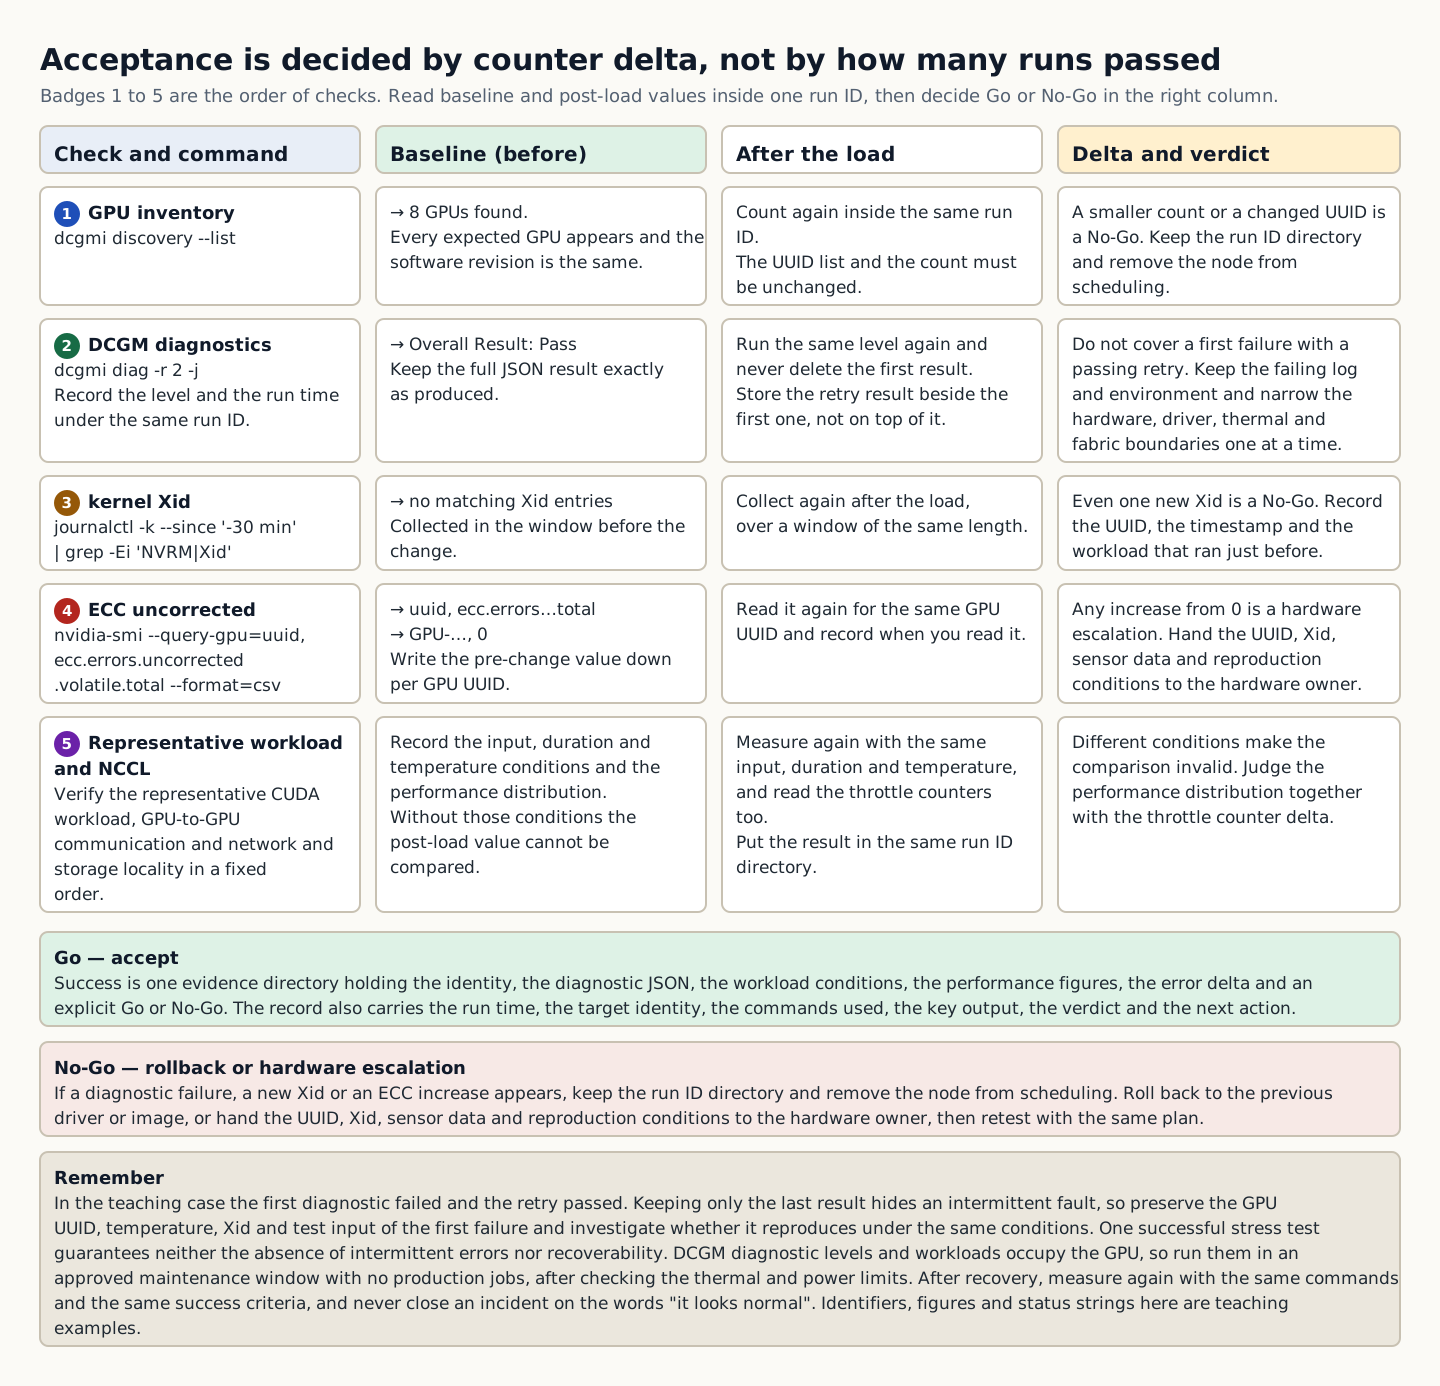
Host acceptance verifies inventory, health, memory and compute load, inter-GPU communication, and network and storage locality in a fixed order. One successful stress test guarantees neither the absence of intermittent errors nor recoverability.

Differences before and after a change can be interpreted only when the baseline and test conditions are fixed. Tie the DCGM diagnostics, a representative CUDA workload, the NCCL results, and the kernel Xid and ECC counter deltas to a single run ID.

If a diagnostic fails, do not automatically repeat the same test until it passes. Preserve the log and the environment of the first failure and narrow the hardware, driver, thermal, and fabric boundaries one at a time.

In the training example, the first diagnostic failed and the retry passed. Keeping only the last result hides an intermittent error. Preserve the GPU UUID, temperature, Xid, and test input from the first failure, and investigate whether it reproduces under the same conditions. The basis for acceptance is not the number of passes but explaining the cause of the failure and verifying that it does not recur.

A table that compares GPU inventory, DCGM diagnostics, kernel Xid, ECC, and a representative workload between baseline and post-load values to decide Go or No-Go
How to read the figure Badges 1 to 5 on the left give the order of checks. The first column is the check item and its command, the second is the baseline before the change, the third is the value read again after load and diagnostics, and the fourth is the delta and verdict. The comparison in the fourth column holds only when both readings are taken with the same command within the same run ID. If any of a diagnostic failure, a new Xid, or an ECC increase appears, follow the No-Go box below: preserve the run ID directory and remove the node from scheduling. The Go box is the success criterion, stating what a single evidence directory must contain for acceptance. The last box is the training case showing that covering a first diagnostic failure with a passing retry hides an intermittent error. This table does not depict time proportions or physical cabling; it shows only the check items and decision criteria. The identifiers, numbers, and status strings in the figure are training examples composed by the author. Source: composed by the author based on NVIDIA DCGM User Guide · NVIDIA DCGM Diagnostics.
Why does this happen?
Differences before and after a change can be interpreted only when the baseline and test conditions are fixed. Tie the DCGM diagnostics, a representative CUDA workload, the NCCL results, and the kernel Xid and ECC counter deltas to a single run ID.
When is it a problem?
If you see diagnostic failures, Xid events, or rising ECC counts, there are insufficient grounds to proceed.
Common beginner misconceptions
DCGM diagnostic levels and workloads use the GPU. Check the thermal and power limits, then run them in an approved maintenance window with no production jobs.
How to verify it yourself
Fix the GPU UUIDs and the software revisions under one run ID. Preserve the DCGM discovery output and the full diagnostic results.
To summarize this sectionYou succeed when you keep the identity, the diagnostic JSON, the workload conditions, performance results, the error delta, and an explicit Go/No-Go in a single evidence directory.
Conceptual explanation 02

Link Field Diagnostic results to return-to-service, retest, or RMA evidence

A Field Diagnostic uses the vendor's official package and procedure to make an overall judgment of GPU hardware state and to produce the evidence needed for a support case or an RMA (Return Merchandise Authorization, the manufacturer's approval for return or replacement) review. DCGM health diagnostics, the Field Diagnostic, and symptom triage are not the same step and do not replace one another.

The executable, the media, and the options are tied to the support case, the system model, and the document version. Some products require dedicated boot media and others use an installation package, so do not generalize one product's media procedure or an undocumented level option to every GPU.

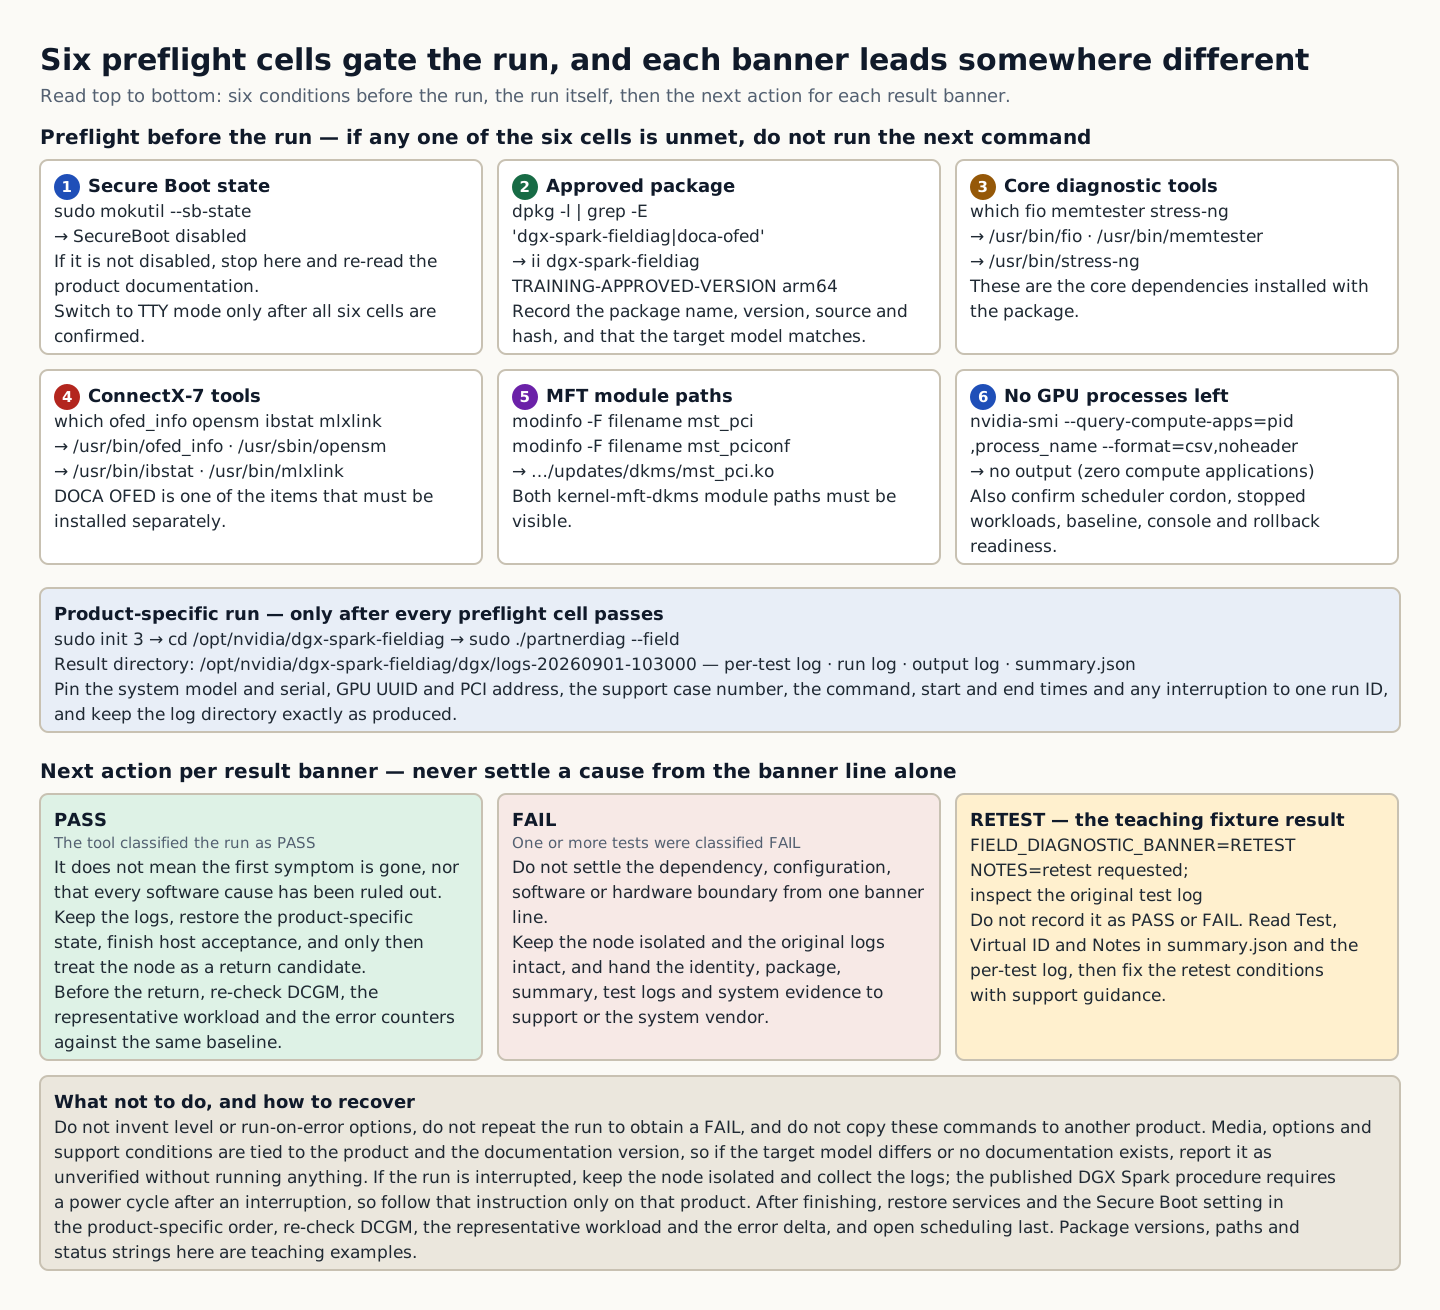
The currently published DGX Spark procedure checks not only the package and the automatically installed core dependencies but also DOCA OFED, which must be installed separately, the mst_pci and mst_pciconf modules from kernel-mft-dkms, the ConnectX-7 tools, and the Secure Boot state. Once everything is ready, switch to TTY mode and run the product package's partnerdiag --field. The result directory holds the individual test logs, the run log, the output log, and summary.json. Connect the PASS, FAIL, or RETEST banner to the next action.

The execution examples in this section are limited to the published NVIDIA DGX Spark documentation. For any other GPU server or add-in board, first confirm the package, media, options, and support conditions specified by the system vendor; if there is no documentation or the target model differs, report it as unconfirmed without running the command.

In the training fixture, the approved package and prerequisite path were confirmed, but the execution result is a RETEST banner. Do not infer a cause from the banner alone. Preserve the first log and the Test, Virtual ID, and Notes fields in summary.json, then finalize the retest conditions according to support guidance and product-specific instructions.

The commands and expected output of six preflight cells, the product-specific partnerdiag run, and the next action for each PASS, FAIL, and RETEST banner
How to read the figure Read from top to bottom. The six cells at the top are the preflight checks before execution, and each cell lists the command and its expected output. If even one of the six is not satisfied, do not proceed down to the execution box in the middle. The middle box shows the switch to TTY mode, the partnerdiag --field run, and the list of logs left in the results directory. The three cells at the bottom give the next action for each result banner, and the result of the training fixture is the value written in the RETEST cell. Do not record RETEST as PASS or FAIL; first read Test, Virtual ID, and Notes in summary.json and the individual test logs. The last box summarizes what not to do and the order for stopping and recovery. This figure is an example from the public DGX Spark documentation; for other products, the packages, media, and options specified by the system vendor take precedence. The package versions, paths, and status strings in the figure are training examples composed by the author. Source: composed by the author based on NVIDIA DGX Spark Field Diagnostics User Guide · NVIDIA DGX Spark Support: Field Diagnostic Software · NVIDIA GPU Debug Guidelines.
Why does this happen?
The currently published DGX Spark procedure checks not only the package and the automatically installed core dependencies but also DOCA OFED, which must be installed separately, the `mst_pci` and `mst_pciconf` modules from `kernel-mft-dkms`, the ConnectX-7 tools, and the Secure Boot state. Once everything is ready, switch to TTY mode and run the product package's `partnerdiag --field`. The result directory holds the individual test logs, the run log, the output log, and `summary.json`. Connect the PASS, FAIL, or RETEST banner to the next action.
When is it a problem?
If the target, package, or permissions do not match, or the result is invalid, do not use the result as a valid hardware verdict.
Common beginner misconceptions
The command above is an example from the currently published DGX Spark documentation; it changes system state and occupies the GPU. Do not run it in the browser lab. Do not copy it to other products, invent arbitrary level or run-on-error options, or run it repeatedly to obtain a FAIL.
How to verify it yourself
Pin the system model and serial, the GPU UUIDs and PCI addresses, and the support case number to the same run ID. Preserve the commands, the start and end times, whether the run was interrupted, and the entire log directory and summary.json exactly as produced.
To summarize this sectionTreat a PASS as a return-to-service candidate only after preserving the logs and completing the product-specific restoration and host acceptance. For a FAIL, keep the node isolated, hand the identity, package, summary, test logs, and system evidence to support or the system vendor, and do not assert a cause. For a RETEST, you succeed when you preserve the first result, settle the retest conditions from the Notes and support instructions, and retest through the same approval procedure.

CHAPTER 1 / 10

Start the checks from the baseline

Do not guess the cause and start by changing settings. If you group the following evidence into records from the same time window, another operator can reproduce the boundary at which the expected state broke.

1. Pin the GPU UUID and software revision under the run ID. 2. Preserve the DCGM discovery output and the full diagnostic result. 3. Record the input, duration, and temperature conditions of a representative workload, along with its performance distribution. 4. Compare the ECC, Xid, and throttle counter deltas before and after the test.

CHAPTER 2 / 10

Pins down the lab target for the health test

Commands for reproducing the isolated environment · do not run them in the browser
dcgmi discovery --list
dcgmi diag -r 2 -j
journalctl -k --since '-30 min' | grep -Ei 'NVRM|Xid'
nvidia-smi --query-gpu=uuid,ecc.errors.uncorrected.volatile.total --format=csv

CHAPTER 3 / 10

Distinguish the output of the communication load from what it means

Expected output for training · not an actual measurement
8 GPUs found.
Overall Result: Pass
# kernel log: no matching Xid entries
uuid, ecc.errors.uncorrected.volatile.total
GPU-..., 0

CHAPTER 4 / 10

Make the go/stop decision on acceptance and recovery

CHAPTER 5 / 10

Re-verify recovery of GPU host verification and rollback

Building RMA evidence with a Field Diagnostic

CHAPTER 6 / 10

Lock in the product and package approval first

Before starting a Field Diagnostic, bind the following evidence to the same run ID. If even one item is unconfirmed, do not guess the command; check with support or the system vendor.

1. Pin the system model and serial, GPU UUID and PCI address, and support case number to the same run ID. 2. Record the vendor-approved package name, version, source, and hash, and confirm that it matches the target model. 3. Confirm scheduler blocking, termination of workloads and GPU processes, the baseline, the console and work window, and rollback readiness. 4. Preserve the command, the start/end times, whether it was aborted, and the entire log directory and summary.json exactly as produced. 5. Link DCGM, kernel Xid/ECC, BMC sensors, symptom reproduction, and the system-level cause check to the Field Diagnostic result.

CHAPTER 7 / 10

Run it after isolation and preflight have passed

Commands for reproducing the isolated environment · do not run them in the browser
sudo mokutil --sb-state
dpkg -l | grep -E 'dgx-spark-fieldiag|doca-ofed|kernel-mft-dkms'
which fio memtester stress-ng
which ofed_info opensm ibstat mlxlink
modinfo -F filename mst_pci
modinfo -F filename mst_pciconf
nvidia-smi --query-compute-apps=pid,process_name --format=csv,noheader
Expected output for training · not an actual measurement
SecureBoot disabled
ii  dgx-spark-fieldiag  TRAINING-APPROVED-VERSION  arm64
ii  doca-ofed             TRAINING-APPROVED-VERSION  arm64
ii  kernel-mft-dkms        TRAINING-APPROVED-VERSION  all
/usr/bin/fio
/usr/bin/memtester
/usr/bin/stress-ng
/usr/bin/ofed_info
/usr/sbin/opensm
/usr/bin/ibstat
/usr/bin/mlxlink
/lib/modules/training-kernel/updates/dkms/mst_pci.ko
/lib/modules/training-kernel/updates/dkms/mst_pciconf.ko
# nvidia-smi compute applications: none

CHAPTER 8 / 10

Run the product-specific commands

Commands for reproducing the isolated environment · do not run them in the browser
sudo init 3
cd /opt/nvidia/dgx-spark-fieldiag
sudo ./partnerdiag --field

CHAPTER 9 / 10

Read PASS, FAIL, and RETEST together with the evidence

Expected output for training · not an actual measurement
FIELD_DIAGNOSTIC_BANNER=RETEST
LOG_DIRECTORY=/opt/nvidia/dgx-spark-fieldiag/dgx/logs-20260901-103000
SUMMARY=/opt/nvidia/dgx-spark-fieldiag/dgx/logs-20260901-103000/summary.json
TEST=training-test-id
VIRTUAL_ID=training-virtual-id
NOTES=retest requested; inspect the original test log

PASS:: a run that the tool classified with a PASS banner. It does not mean that the original symptom is gone or that all software causes have been ruled out, so host acceptance is required after restoring the system. FAIL:: a result in which one or more tests were classified as FAIL. Do not conclude the dependency, configuration, software, or hardware boundary from a single banner line; keep the node isolated and the original logs intact, and pass them to support or the system vendor together with the system evidence. RETEST:: a result that the tool classified with a RETEST banner. Do not record it as PASS or FAIL; check summary.json and the Test, Virtual ID, and Notes fields in the individual test logs, then retest according to support and the product-specific instructions.

CHAPTER 10 / 10

Recover or hand off based on the verdict and evidence

CONCRETE CASES

Classify the failure domain from the provided DCGM diagnostics and NCCL results, and choose either a rollback or a hardware escalation.

If a diagnostic fails, do not automatically repeat the same test until it passes. Preserve the log and the environment of the first failure and narrow the hardware, driver, thermal, and fabric boundaries one at a time.

Wrong responses and boundaries to check

DCGM diagnostic levels and workloads use the GPU. Run them in an approved maintenance window with no production jobs, after checking thermal and power limits. The command above is an example from the currently published DGX Spark documentation; it changes system state and occupies the GPU. Do not run it in the browser lab. Do not copy it to other products, invent arbitrary level or run-on-error options, or run it repeatedly to obtain a FAIL.

On failure, preserve the run ID directory and remove the node from scheduling. Roll back to the previous driver/image, or send the UUID, Xid, sensor data, and reproduction conditions to the hardware owner, then retest with the same plan. After recovery, measure again with the same commands and the same success criteria. Do not close an incident just because things appear normal. If the run is interrupted, keep the node isolated and collect the logs. The published DGX Spark procedure requires a power cycle after an interruption, so follow that instruction only on that product. Retest after resolving the RETEST cause or receiving instructions from support. When finished, restore the service and Secure Boot settings in the product-specific order, then recheck DCGM, a representative workload, and the error delta, and open scheduling last. After recovery, recheck DCGM, the representative workload, and error counters against the same identity and baseline. Do not approve a return to service or an RMA based on a single line of Field Diagnostic output.

INTERACTIVE LAB 1 / 2

Lab 1 · Find the basis for a verdict in the output

Enter values in the browser and check the execution results and the failure and recovery paths. No commands are ever sent to real equipment or the NAS.

Lab scenario:: From the provided DCGM diagnostic and NCCL results, classify the failure domain and choose between a rollback and a hardware escalation. Instructions:: In the browser, read the training output below and write a verdict. Do not send the commands to real equipment. To reproduce the commands separately, prepare an approved isolated environment with the relevant tools and example files. Save the entire output, and if you see a diagnostic failure, an Xid event, or rising ECC counts, do not move on to the next change. Lab scenario:: Do not turn the RETEST in the training transcript into a FAIL or guess at the cause; instead write a verdict listing the items to check in the original log, the retest approval order, the conditions that forbid a return to service, and the evidence to hand to support. Instructions:: In the browser, read the commands below and the training transcript, and write a verdict. Do not send commands to real equipment. Any separate reproduction is done only in an isolated environment with the current official documentation for the product, an approved package, a console, a work window, and a rollback path.

8 GPUs found.
Overall Result: Pass
# kernel log: no matching Xid entries
uuid, ecc.errors.uncorrected.volatile.total
GPU-..., 0

The point is not to memorize the values themselves but to confirm that every expected GPU passes the health test at the same revision and that no new fatal error appeared. The values shown are reproduced examples for training, not measurements taken on real equipment. Identifiers and values can differ by device, driver, and cluster.

SecureBoot disabled
ii  dgx-spark-fieldiag  TRAINING-APPROVED-VERSION  arm64
ii  doca-ofed             TRAINING-APPROVED-VERSION  arm64
ii  kernel-mft-dkms        TRAINING-APPROVED-VERSION  all
/usr/bin/fio
/usr/bin/memtester
/usr/bin/stress-ng
/usr/bin/ofed_info
/usr/sbin/opensm
/usr/bin/ibstat
/usr/bin/mlxlink
/lib/modules/training-kernel/updates/dkms/mst_pci.ko
/lib/modules/training-kernel/updates/dkms/mst_pciconf.ko
# nvidia-smi compute applications: none

This output is a training preflight fixture normalized for learning the check items in the published documentation; it is not output from real equipment. Secure Boot must be disabled; the approved package, the core and CX-7 binaries, and both MFT module paths must all be present; and no compute application may be active. If any one of these conditions is not met, stop here and do not run the next command.

FIELD_DIAGNOSTIC_BANNER=RETEST
LOG_DIRECTORY=/opt/nvidia/dgx-spark-fieldiag/dgx/logs-20260901-103000
SUMMARY=/opt/nvidia/dgx-spark-fieldiag/dgx/logs-20260901-103000/summary.json
TEST=training-test-id
VIRTUAL_ID=training-virtual-id
NOTES=retest requested; inspect the original test log

This transcript is a training result fixture normalized for learning the result items in the published documentation; it is not output from real equipment. In this normalized transcript, the prerequisite paths are present, but the tool issued a RETEST banner. Your verdict must therefore state that you do not guess the cause and instead check summary.json and the Test, Virtual ID, and Notes fields in the individual test logs.

INTERACTIVE LAB 2 / 2

Lab 2 · Plan for stopping and recovery

Enter values in the browser and check the execution results and the failure and recovery paths. No commands are ever sent to real equipment or the NAS.

DCGM diagnostic levels and workloads use the GPU. Run them in an approved maintenance window with no production jobs, after checking thermal and power limits. The command above is an example from the currently published DGX Spark documentation; it changes system state and occupies the GPU. Do not run it in the browser lab. Do not copy it to other products, invent arbitrary level or run-on-error options, or run it repeatedly to obtain a FAIL.

KEY TERMS

Key terms in this unit

Baseline
Evidence recording the target, version, conditions and state so before and after a change can be compared.
Field Diagnostic
A diagnostic that uses the official product-specific package and procedure to reach an overall hardware verdict and produce the evidence needed for a support or RMA review.
RMA (Return Merchandise Authorization, the manufacturer's approval for return or replacement)
A process in which the manufacturer or system vendor reviews diagnostic evidence and approves a return or replacement.

UNIT WORKBOOK

Exercises and worksheets for applying concepts to new situations

Start by checking basic principles, then expand to practical workplace decisions. After submitting an answer, you can see why every option is correct or incorrect, not just the correct answer.

Document the stop conditions and recovery evidence for isolation, return to service, retesting, and the RMA evidence package in a work record.

PERSONAL WORKSHEET

A learning worksheet you adapt to your own environment

Your input remains only on the current browser screen and is not stored or transmitted externally. Use categories and pseudonyms instead of actual sensitive information.

OFFICIAL SOURCES

Verify against official sources

Reviewed against official documentation and training output. Commands and performance tests on real hardware are unconfirmed.

DECISION ACTIVITY

After a driver update, 1 of 8 GPUs has disappeared from nvidia-smi. What is the first response?

First write down the evidence you need and the stop criteria, then choose a verdict.

Choose an answer

THREE-LEVEL ASSESSMENT

From basic principles to operational decisions

When you submit an answer you can see why every option is right or wrong.

Basic Question 1

What does the CUDA Version shown by nvidia-smi mean?

Choose an answer
Apply Question 2

Why do you check the locality of the GPU and the NIC?

Choose an answer
Capstone Question 3

A Field Diagnostic returned RETEST. What must be done before requesting an RMA?

Choose an answer

LEARNING RECORD

Have you reviewed the text, decision activities, and all explanations?

Completion status is stored only in this browser.